Reports
Reports use embedded analytics, so they load differently from normal list and form pages. The left sidebar is the report catalog, and the main workspace renders the selected dashboard or table after an extended load window.
Live validation date: March 12, 2026
1. Open the Reports Workspace
Purpose: Confirm the reporting module is reachable and the live report catalog loads.
Route / context: /reports/superset/1
Steps:
- Sign in to the portal.
- Open Reports from the top navigation.
- Allow the page extra time to load.
- Confirm the left report catalog appears.
- Confirm the default report body renders on the right.
Expected result: The Reports workspace opens with the catalog on the left and the selected report in the main panel.
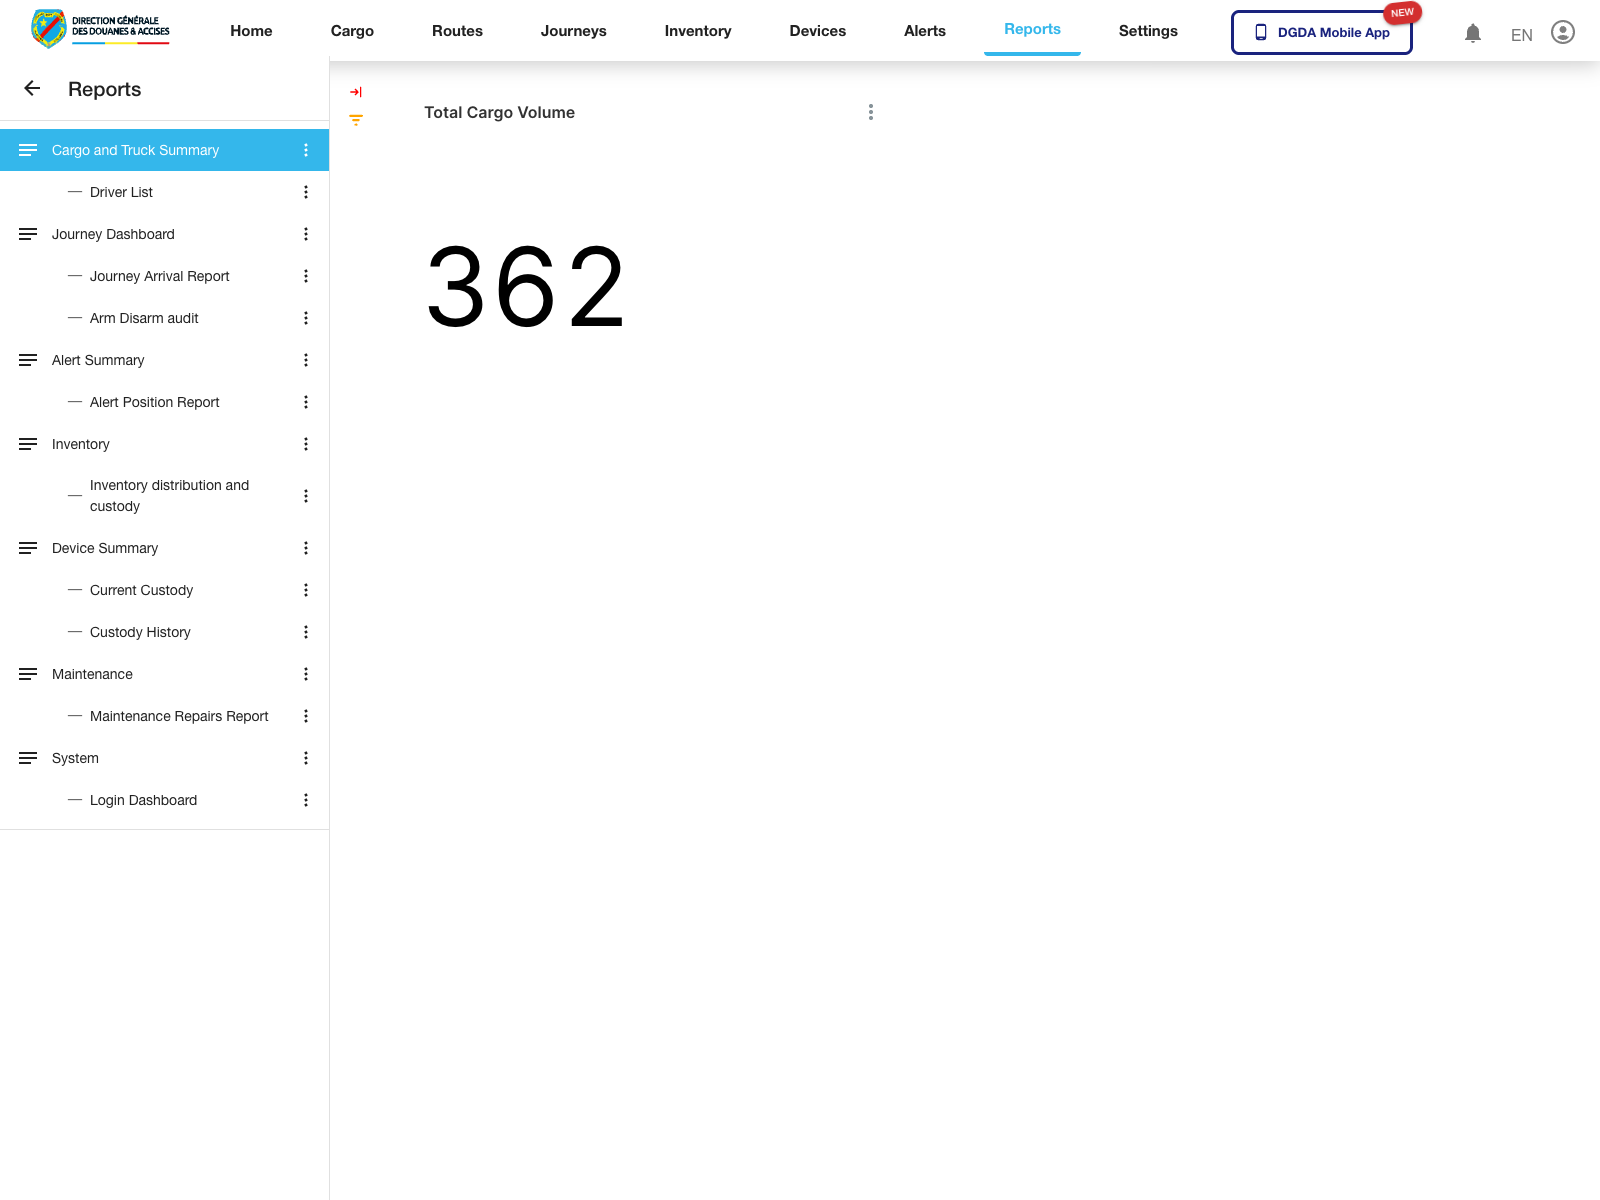
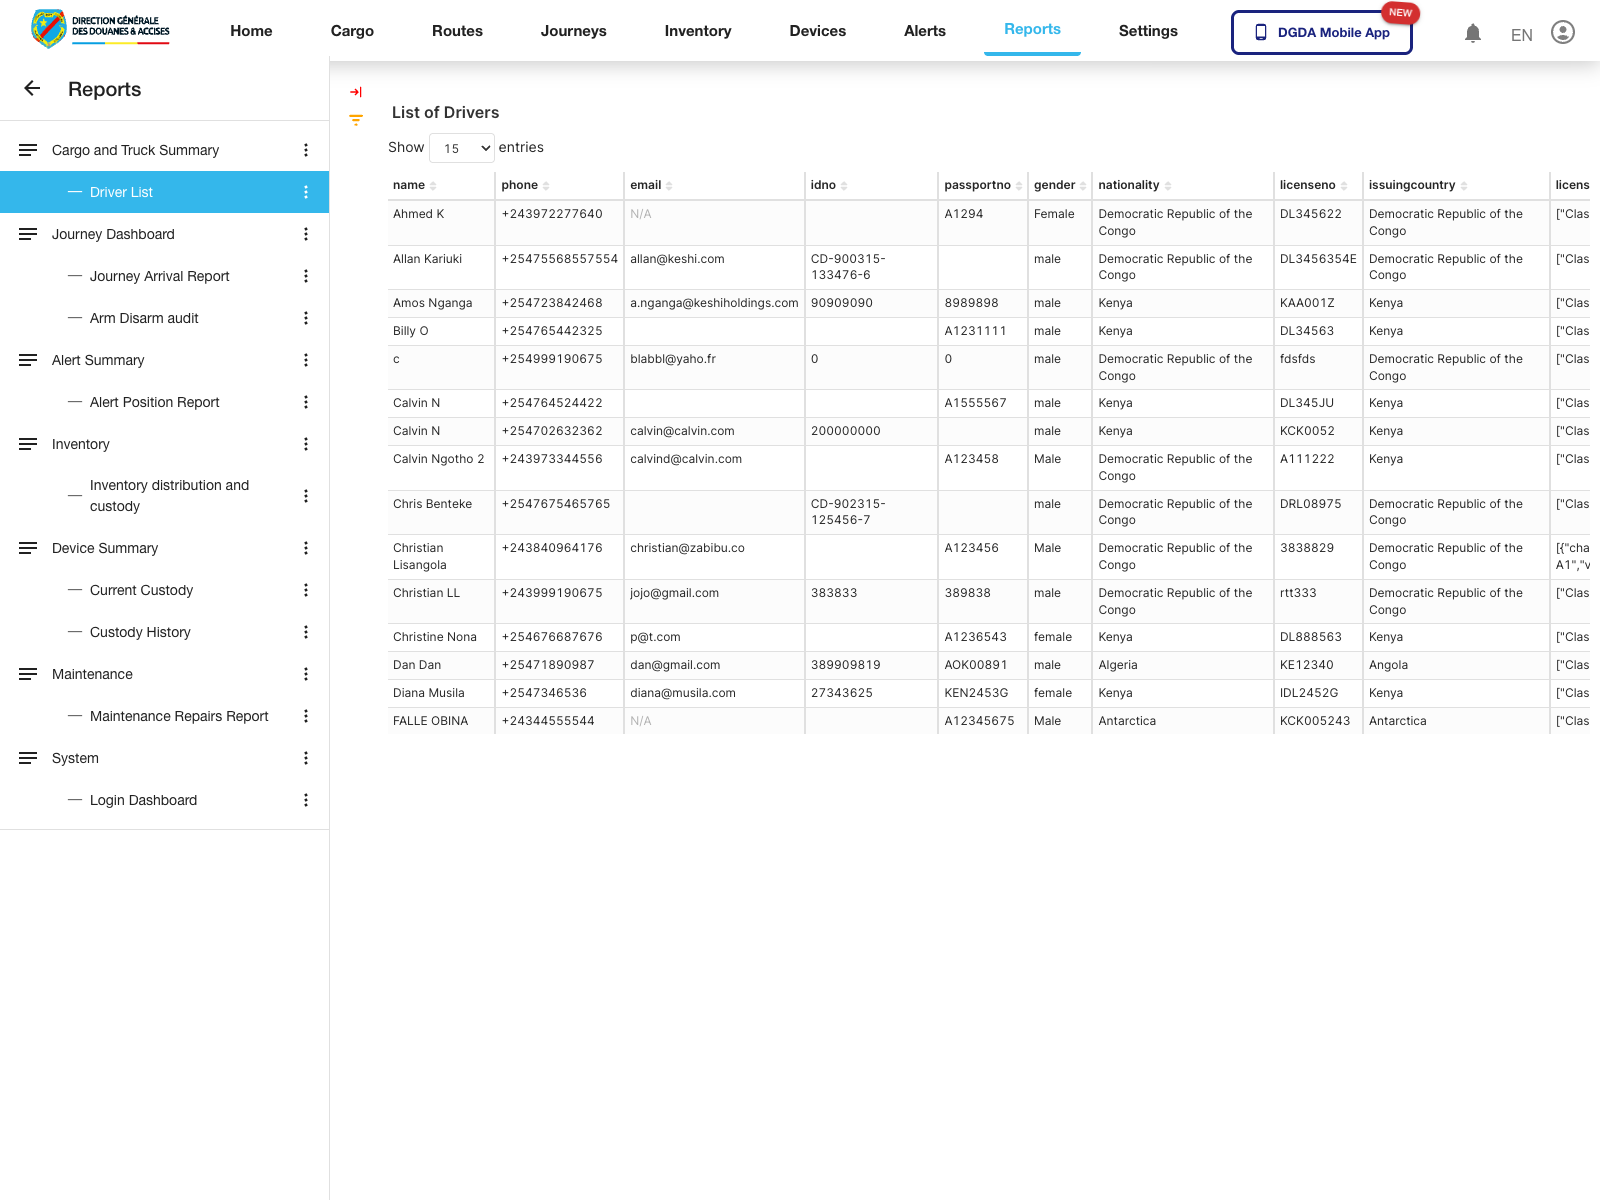
2. Cargo and Driver Reports
Purpose: Review cargo volume and driver registry reporting.
Validated routes:
Cargo and Truck Summary->/reports/superset/1Driver List->/reports/superset/18
Steps:
- Start from the Reports workspace.
- Select Cargo and Truck Summary when you need the default cargo dashboard.
- Select Driver List when you need the reporting view focused on drivers.
- Wait for the embedded analytics panel to finish rendering before changing report again.
Expected result: The cargo dashboard or driver report loads without leaving the portal shell.
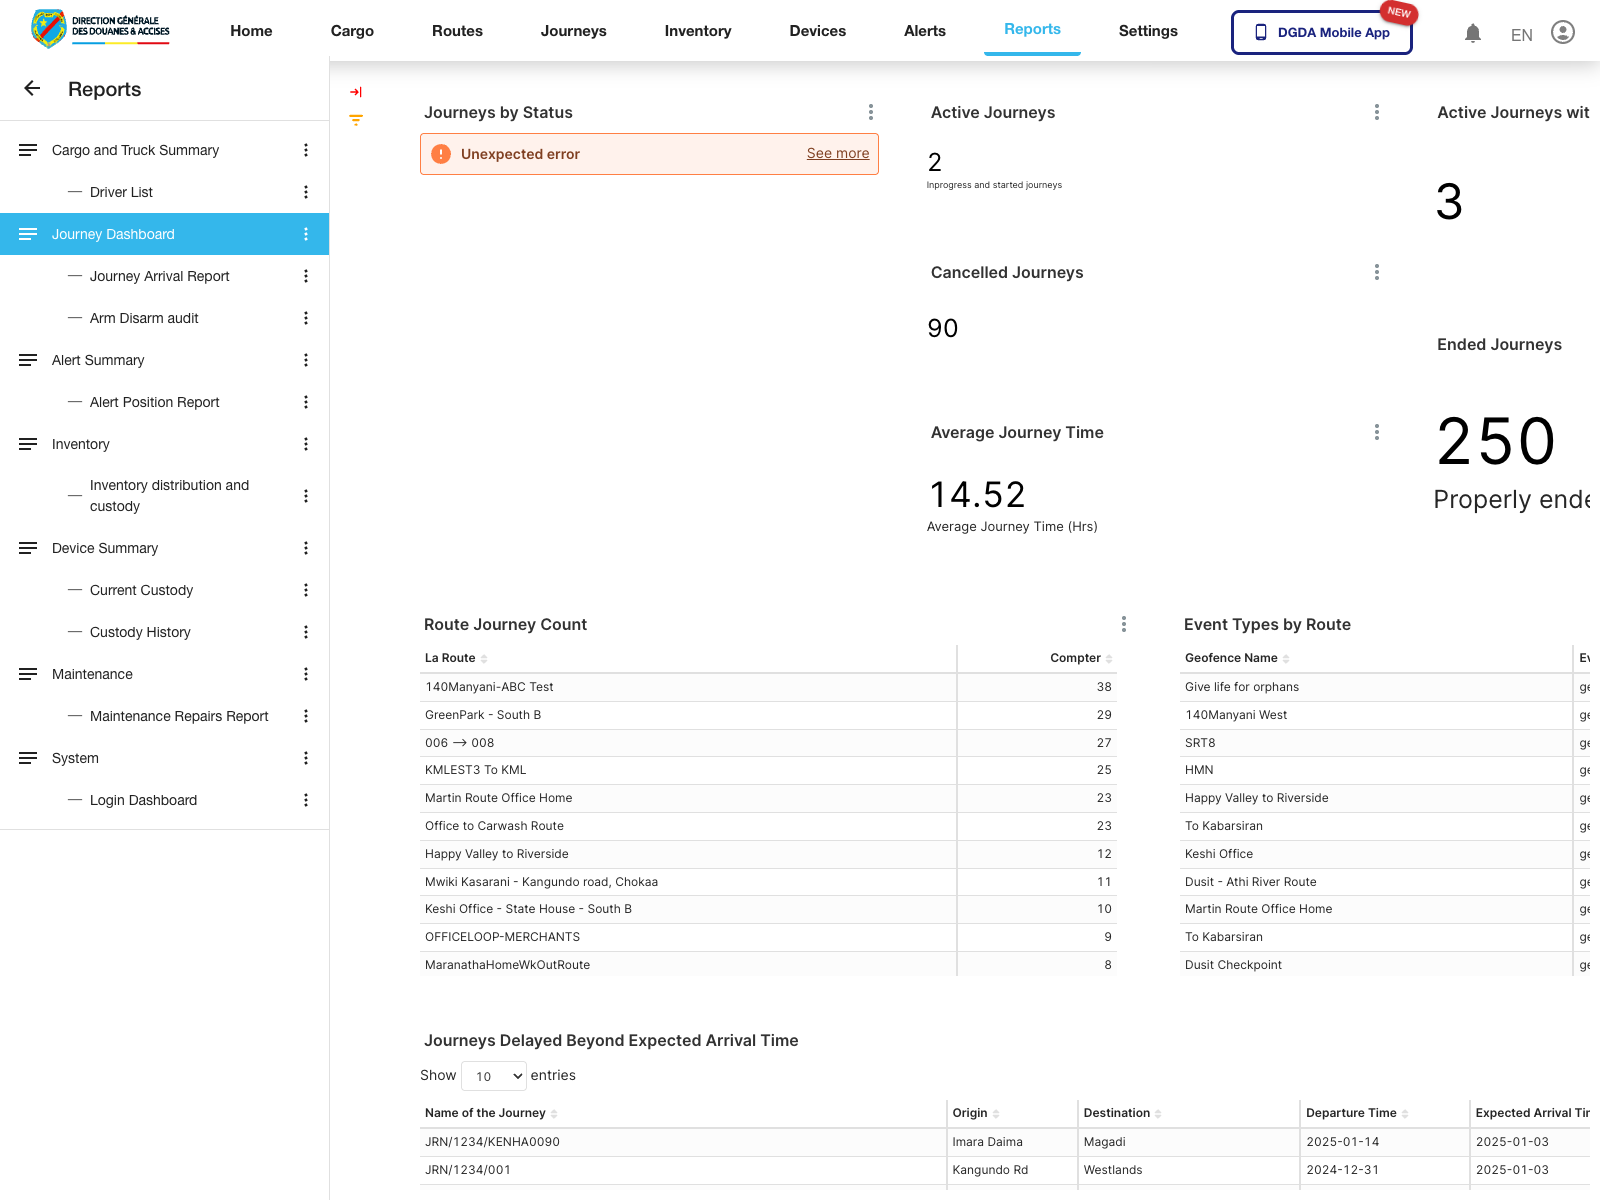
3. Journey Reports
Purpose: Review journey analytics, arrival outcomes, and arm/disarm audit activity.
Validated routes:
Journey Dashboard->/reports/superset/2Journey Arrival Report->/reports/superset/8Arm Disarm audit->/reports/superset/19
Steps:
- Open Journey Dashboard for overall journey analytics.
- Use the same sidebar section to switch to Journey Arrival Report or Arm Disarm audit.
- Pause after each selection so the analytics frame can finish rendering.
Expected result: Journey reporting pages render inside the same analytics workspace, with the left catalog remaining available for switching.
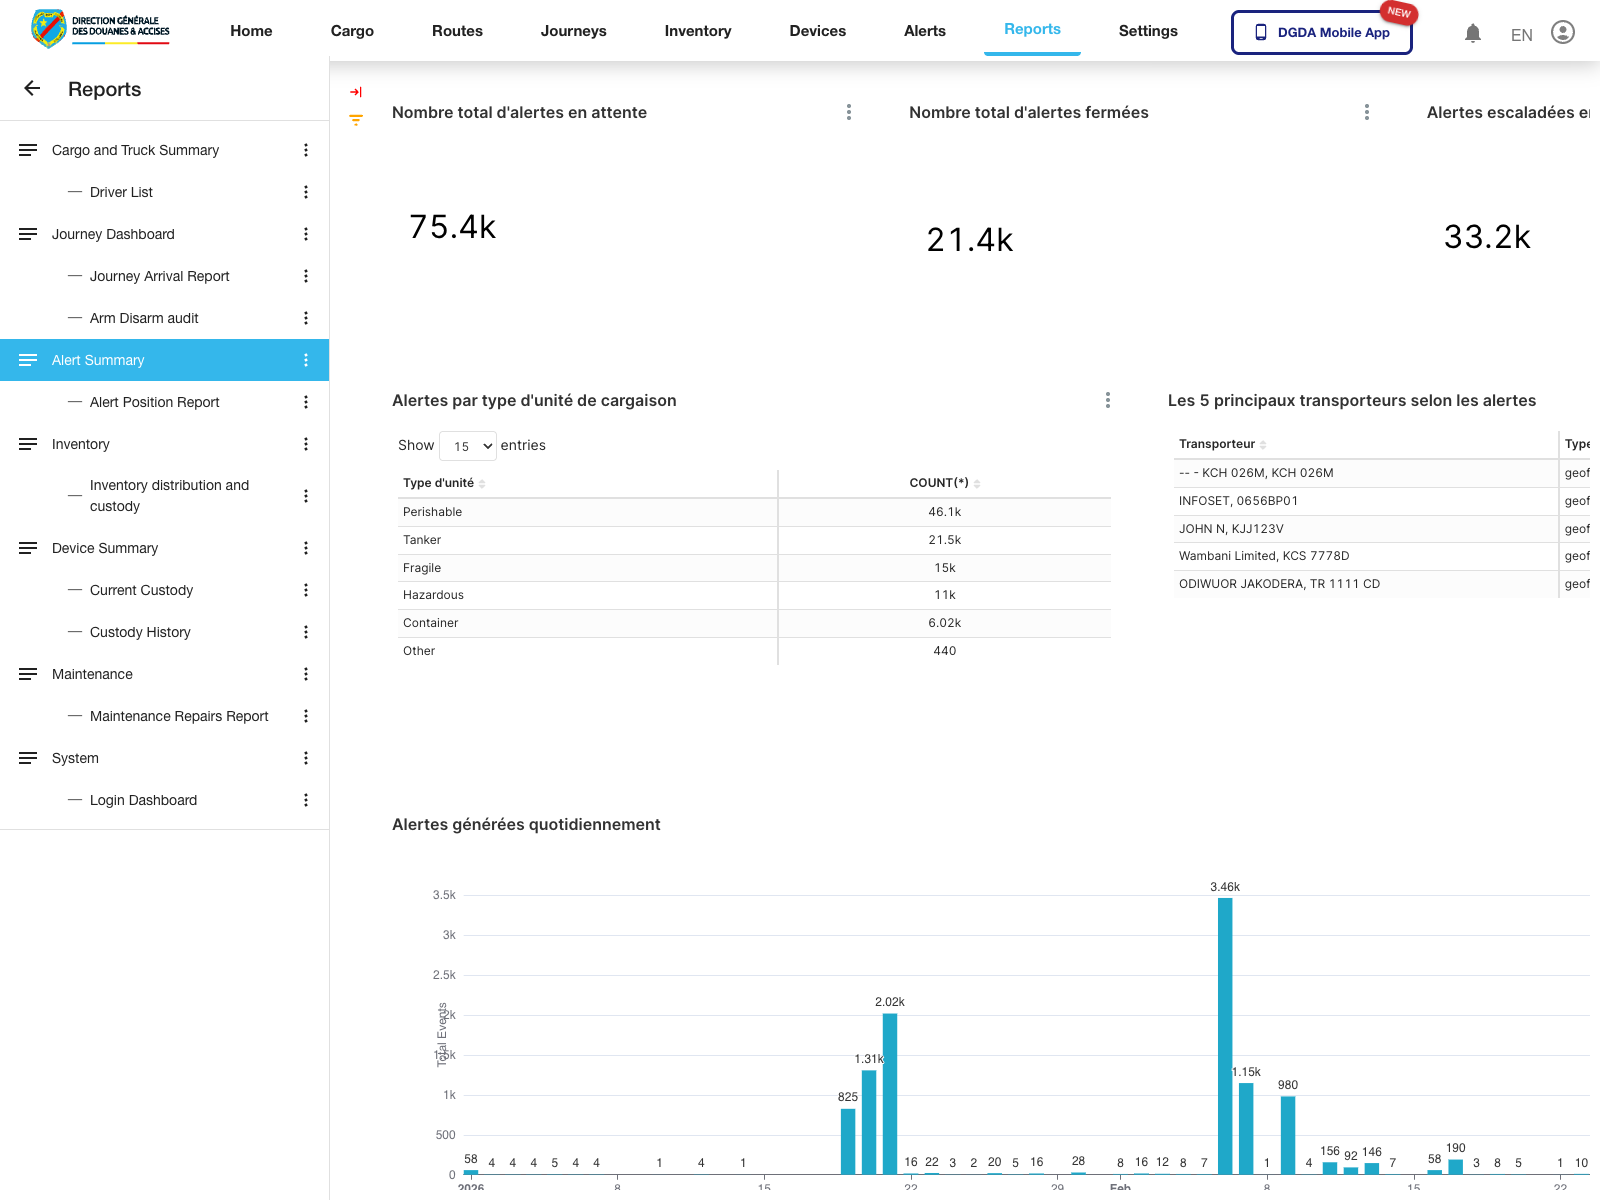
4. Alert Reports
Purpose: Review alert trends and alert-position analysis.
Validated routes:
Alert Summary->/reports/superset/3Alert Position Report->/reports/superset/9
Steps:
- Select Alert Summary for the main alert analytics dashboard.
- Switch to Alert Position Report when the investigation needs position-focused reporting.
- Treat a short blank state as normal while the iframe content loads.
Expected result: Alert dashboards render within the Reports workspace after the normal extended load window.
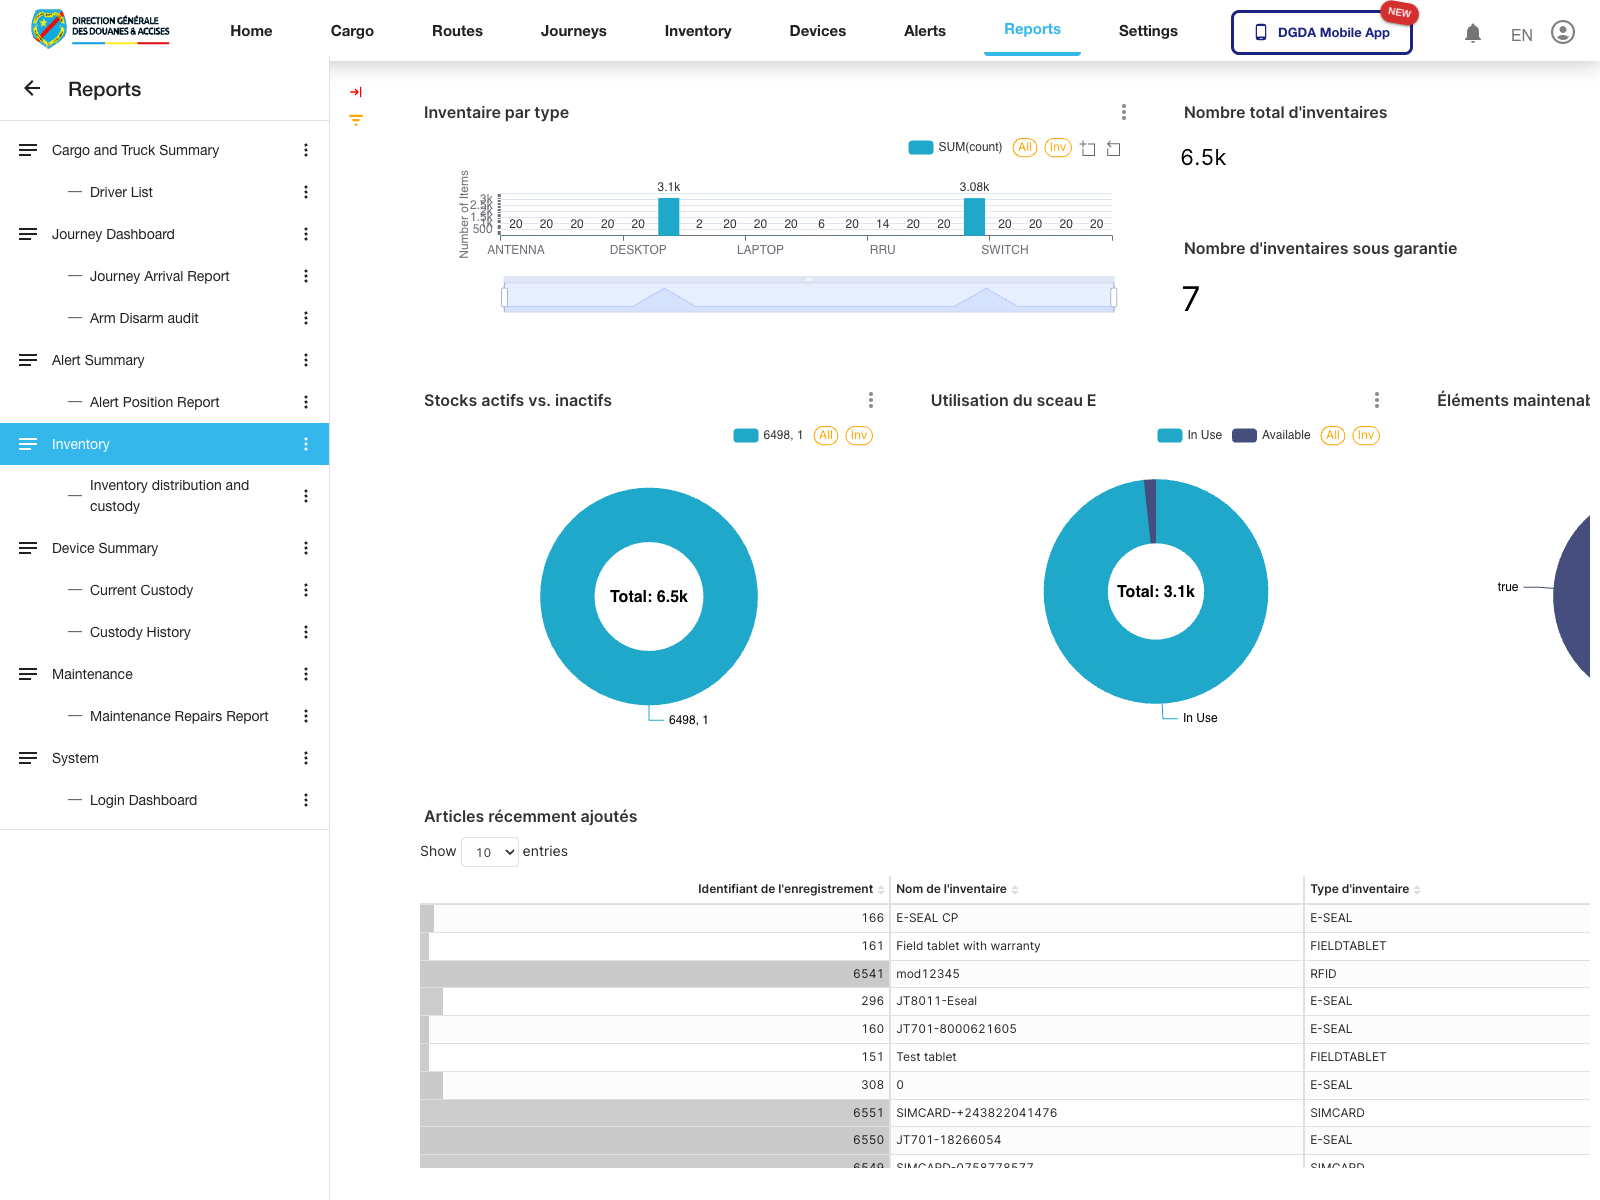
5. Inventory Reports
Purpose: Review stock visibility and inventory custody distribution.
Validated routes:
Inventory->/reports/superset/4Inventory distribution and custody->/reports/superset/15
Steps:
- Select Inventory for the standard inventory report.
- Use Inventory distribution and custody when the focus is distribution or custody analysis.
- Wait for the report panel to refresh fully before capturing or presenting the result.
Expected result: Inventory reporting opens in the same embedded analytics frame without leaving the portal.
6. Device and Custody Reports
Purpose: Review device-level analytics and custody history.
Validated routes:
Device Summary->/reports/superset/11Current Custody->/reports/superset/12Custody History->/reports/superset/13
Steps:
- Select Device Summary for the main device dashboard.
- Use Current Custody when the immediate custody position matters.
- Use Custody History when the investigation needs prior handoff context.
Expected result: Device and custody reports render as report pages inside the same module shell.

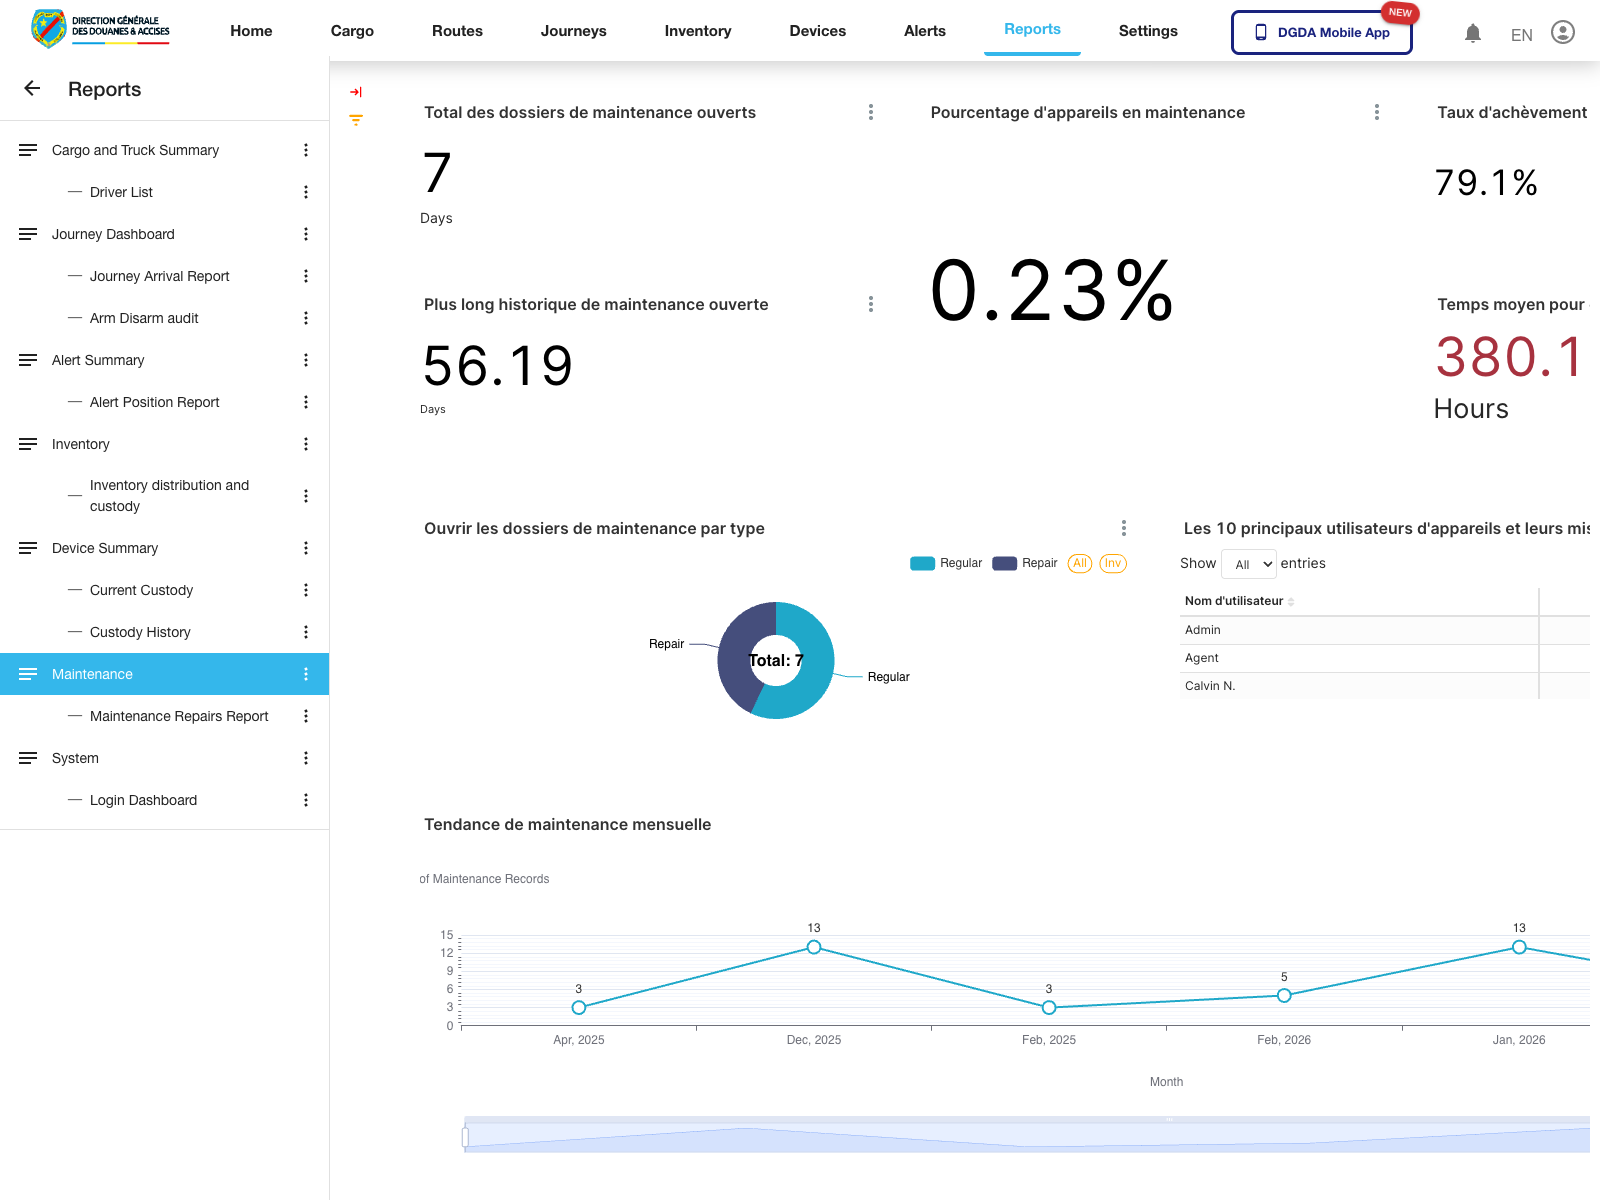
7. Maintenance Reports
Purpose: Review maintenance workload and repair reporting.
Validated routes:
Maintenance->/reports/superset/5Maintenance Repairs Report->/reports/superset/14
Steps:
- Select Maintenance for the main maintenance dashboard.
- Switch to Maintenance Repairs Report when the focus is repair-specific reporting.
- Use the visible charts, summary tiles, and tables after the dashboard finishes loading.
Expected result: Maintenance reporting renders with charts and summary metrics inside the portal analytics panel.
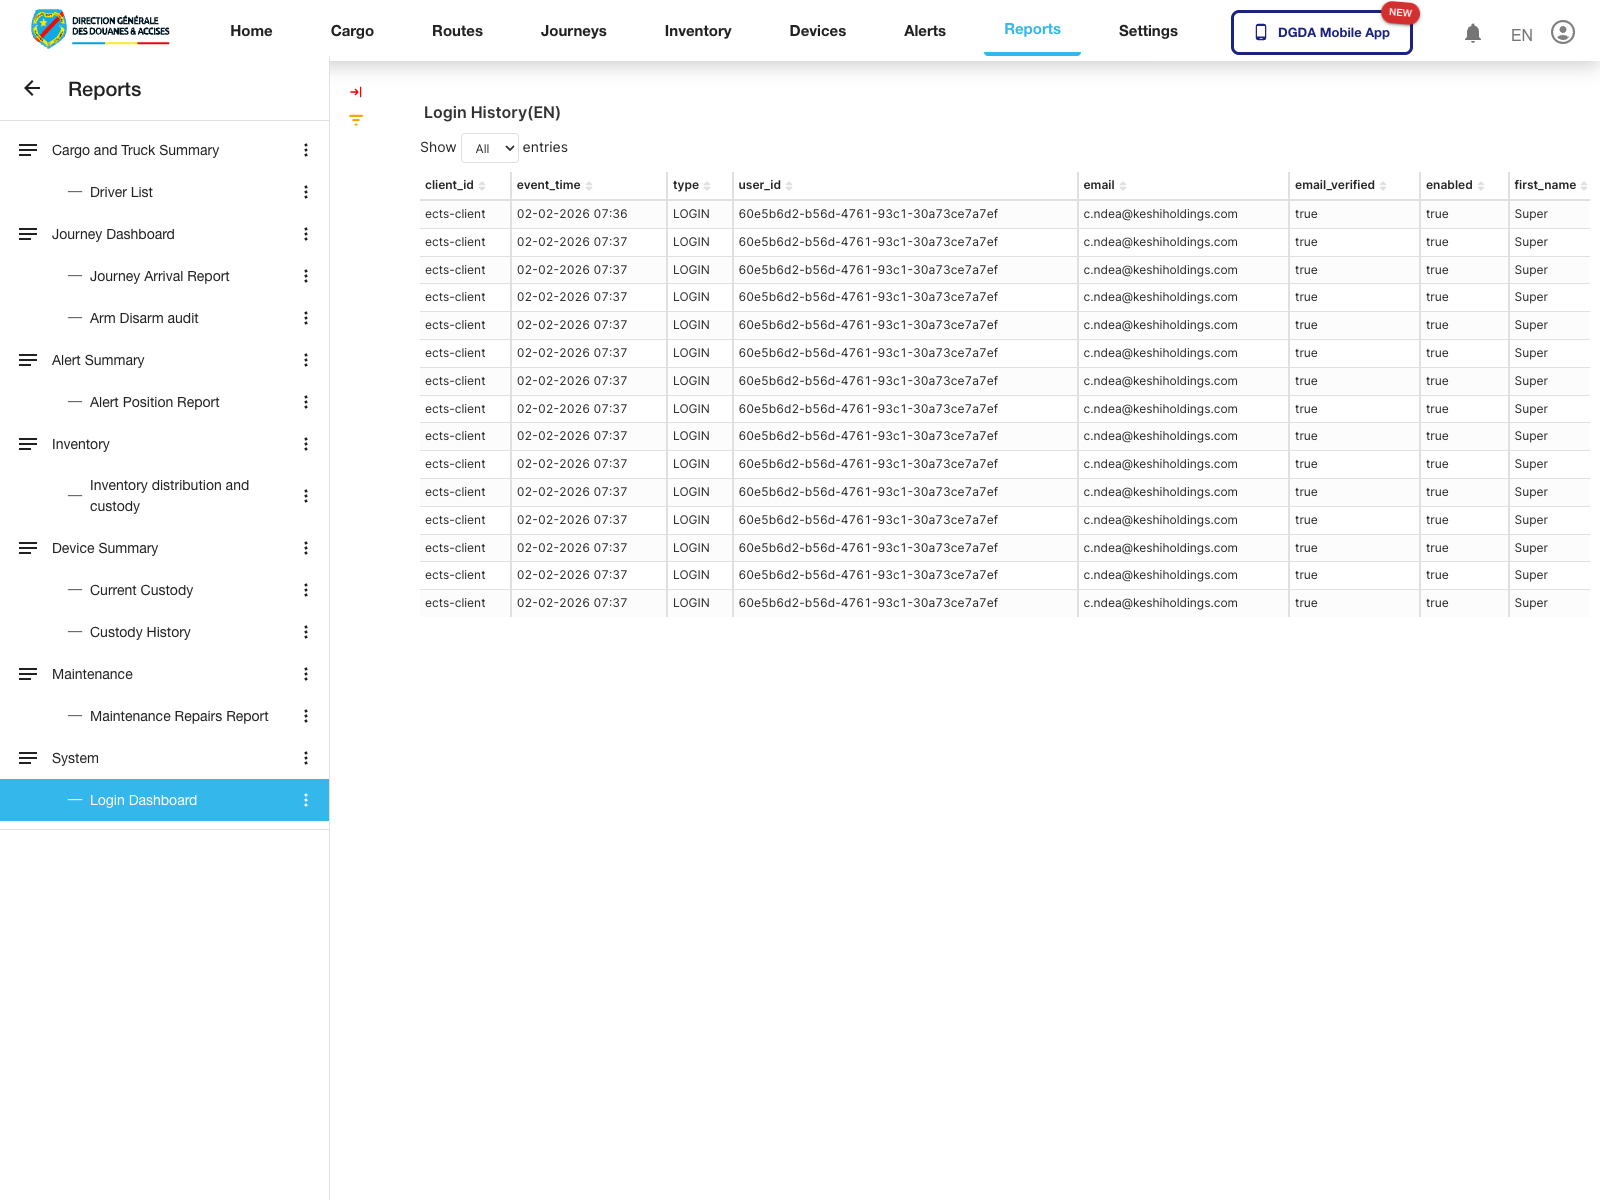
8. System Report
Purpose: Review access-related analytics from the system reporting area.
Validated route:
Login Dashboard->/reports/superset/10
Steps:
- Open the System section at the bottom of the report catalog.
- Select Login Dashboard.
- Wait for the dashboard to render before drawing conclusions from the page.
Expected result: The system login dashboard loads successfully inside the same reporting shell.
9. Operational Notes for Reports
- Reports can load more slowly than normal list, form, or dashboard pages.
- The first load after sign-in is often slower than later report switches.
- A short blank interval is not, by itself, evidence of failure.
- If the catalog loads but a selected report does not, wait through the normal extended report window before escalating.
- Escalate when multiple report pages repeatedly fail after their normal load window or when the report catalog itself does not appear.