Cargo, Carriers, and Drivers
This section covers the cargo work queues and the related operational registries used to prepare and monitor transport activity.
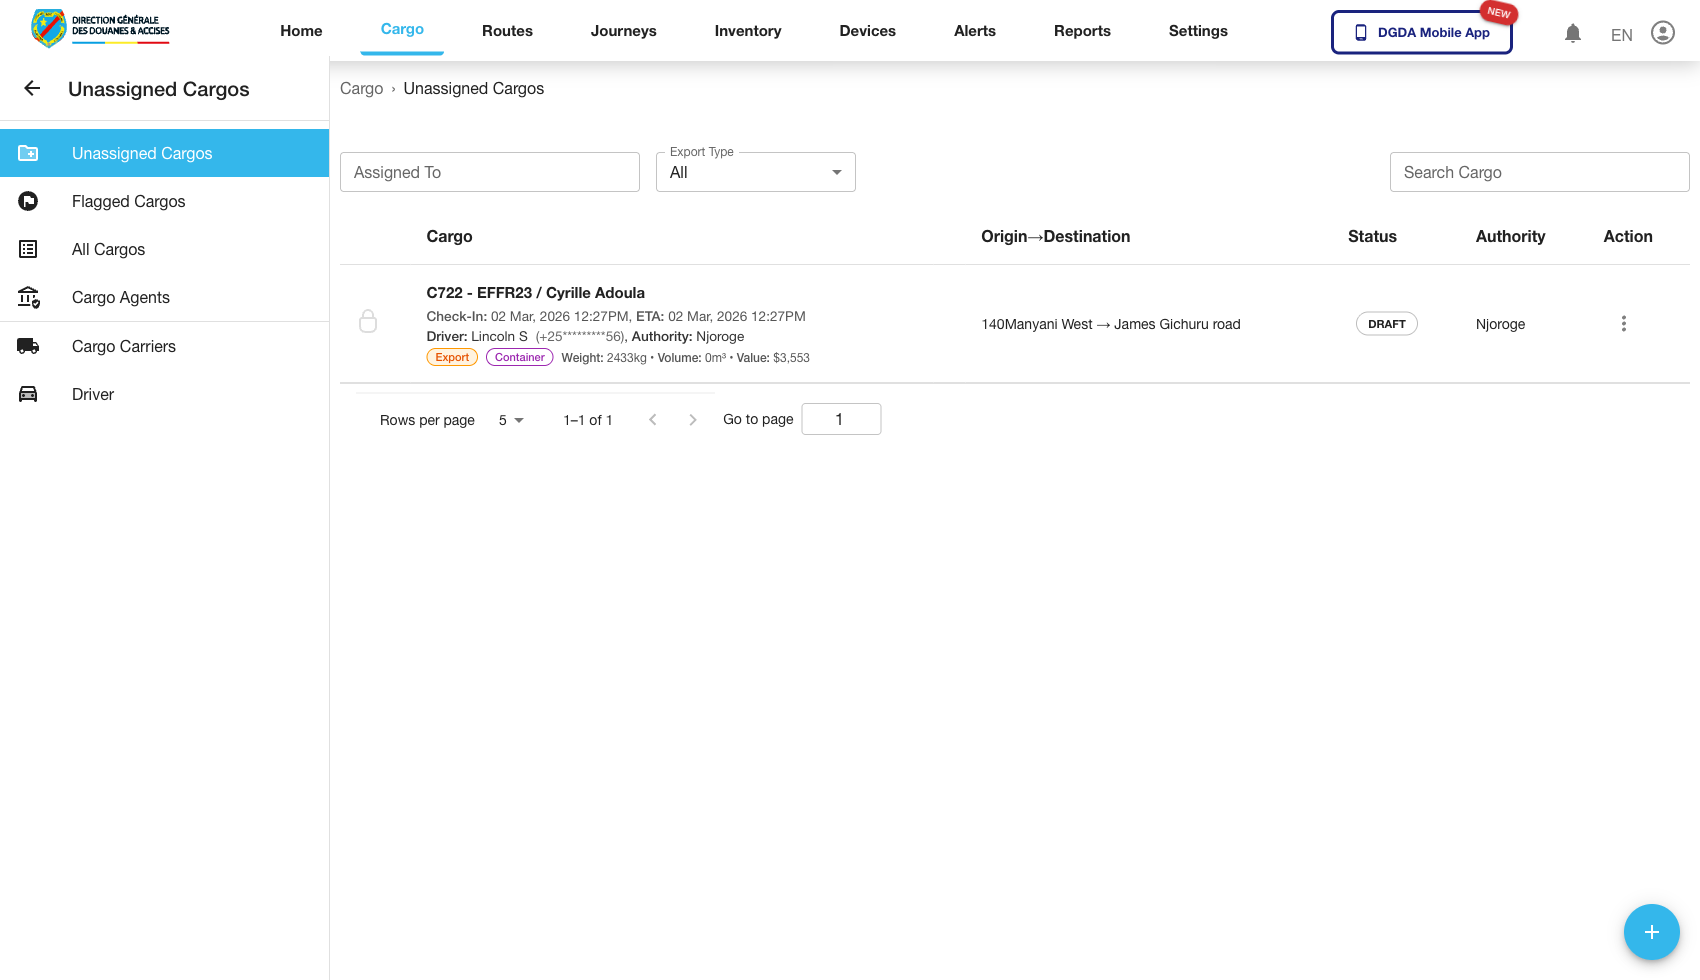
1. Review Unassigned Cargo
Purpose: Identify cargo that is still waiting to be linked to an operational journey.
Route / context: /cargo/unassigned-cargo
Steps:
- Open Cargo from the top navigation.
- Select Unassigned Cargo.
- Review rows that are awaiting assignment.
- Use filters or search to isolate the cargo record you need.
- Open row actions or continue to a related assignment workflow if required by your role.
Expected result: The unassigned queue shows cargo records that still need dispatch preparation or assignment.
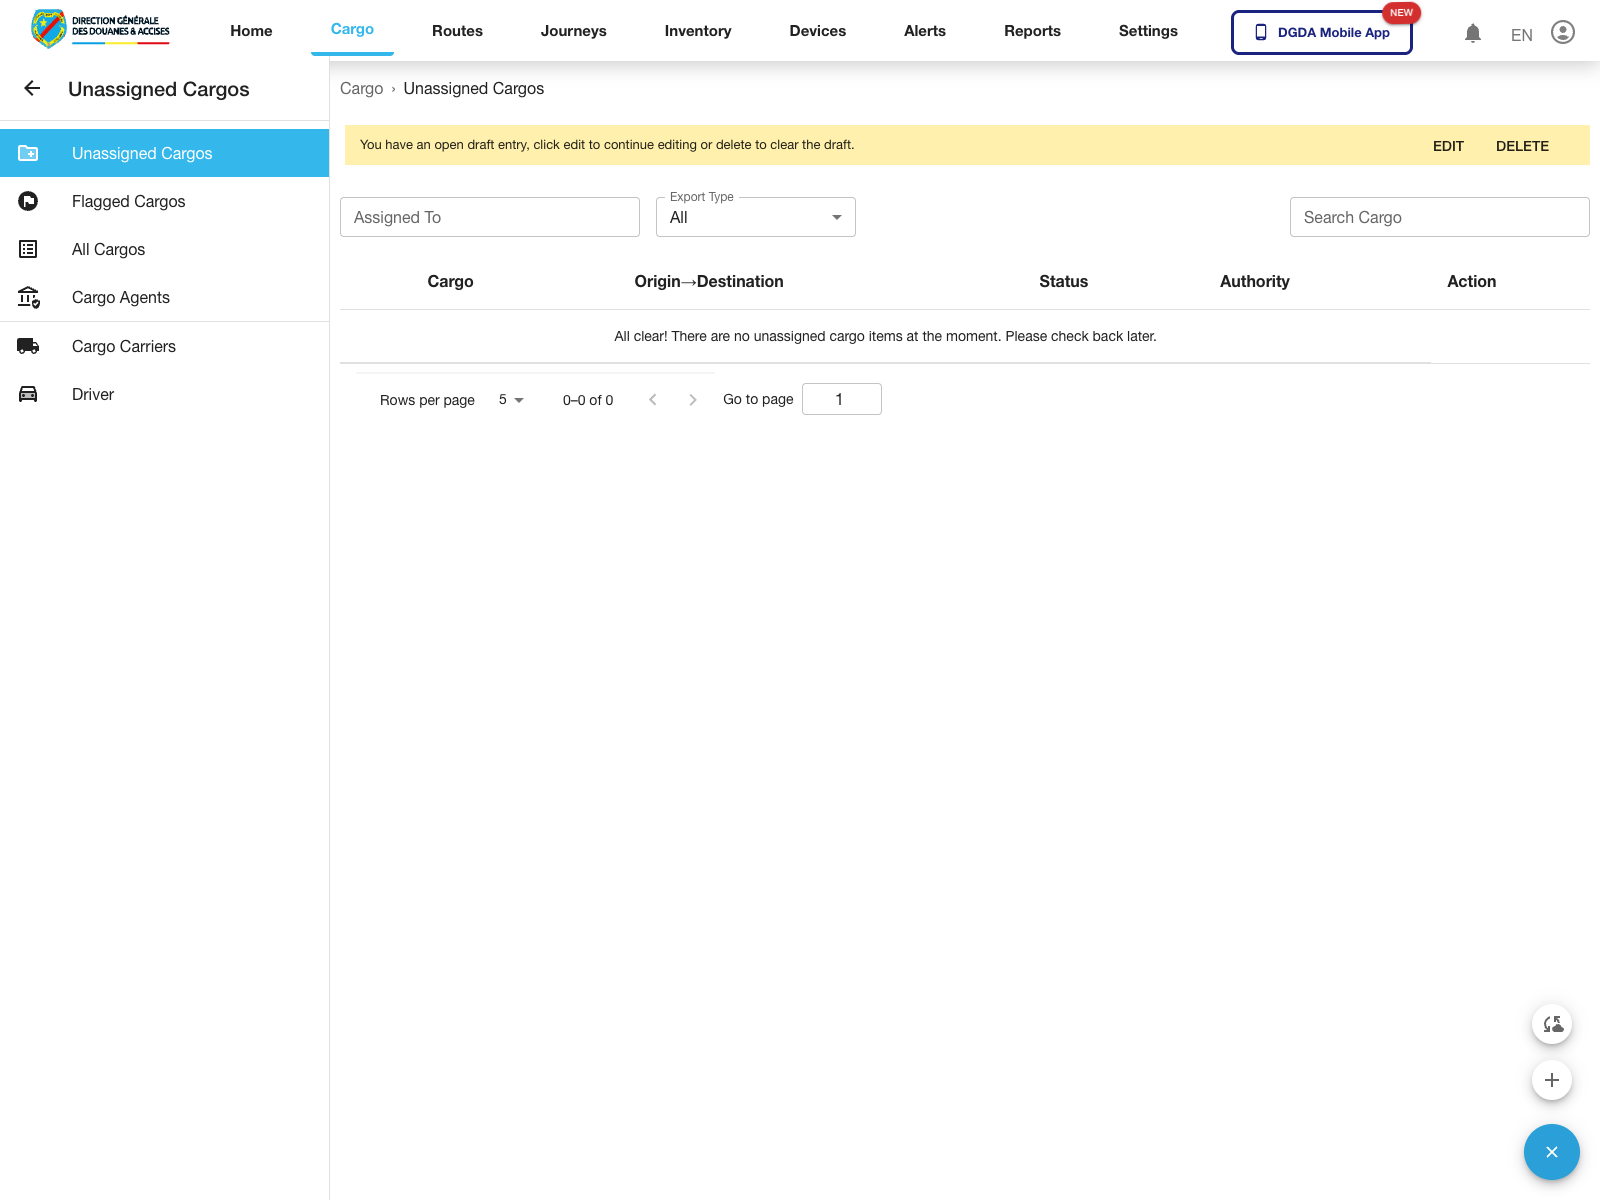
2. Resume or Clear an Existing Cargo Draft
Purpose: Continue a partially prepared cargo record or explicitly remove the unfinished draft before starting over.
Route / context: /cargo/unassigned-cargo
Steps:
- Open Unassigned Cargo.
- Look for the draft banner above the table area.
- Review the draft message before deciding how to proceed.
- Use Edit to continue the draft or Delete to remove it.
Expected result: The portal exposes the draft controls before a new cargo entry is started.
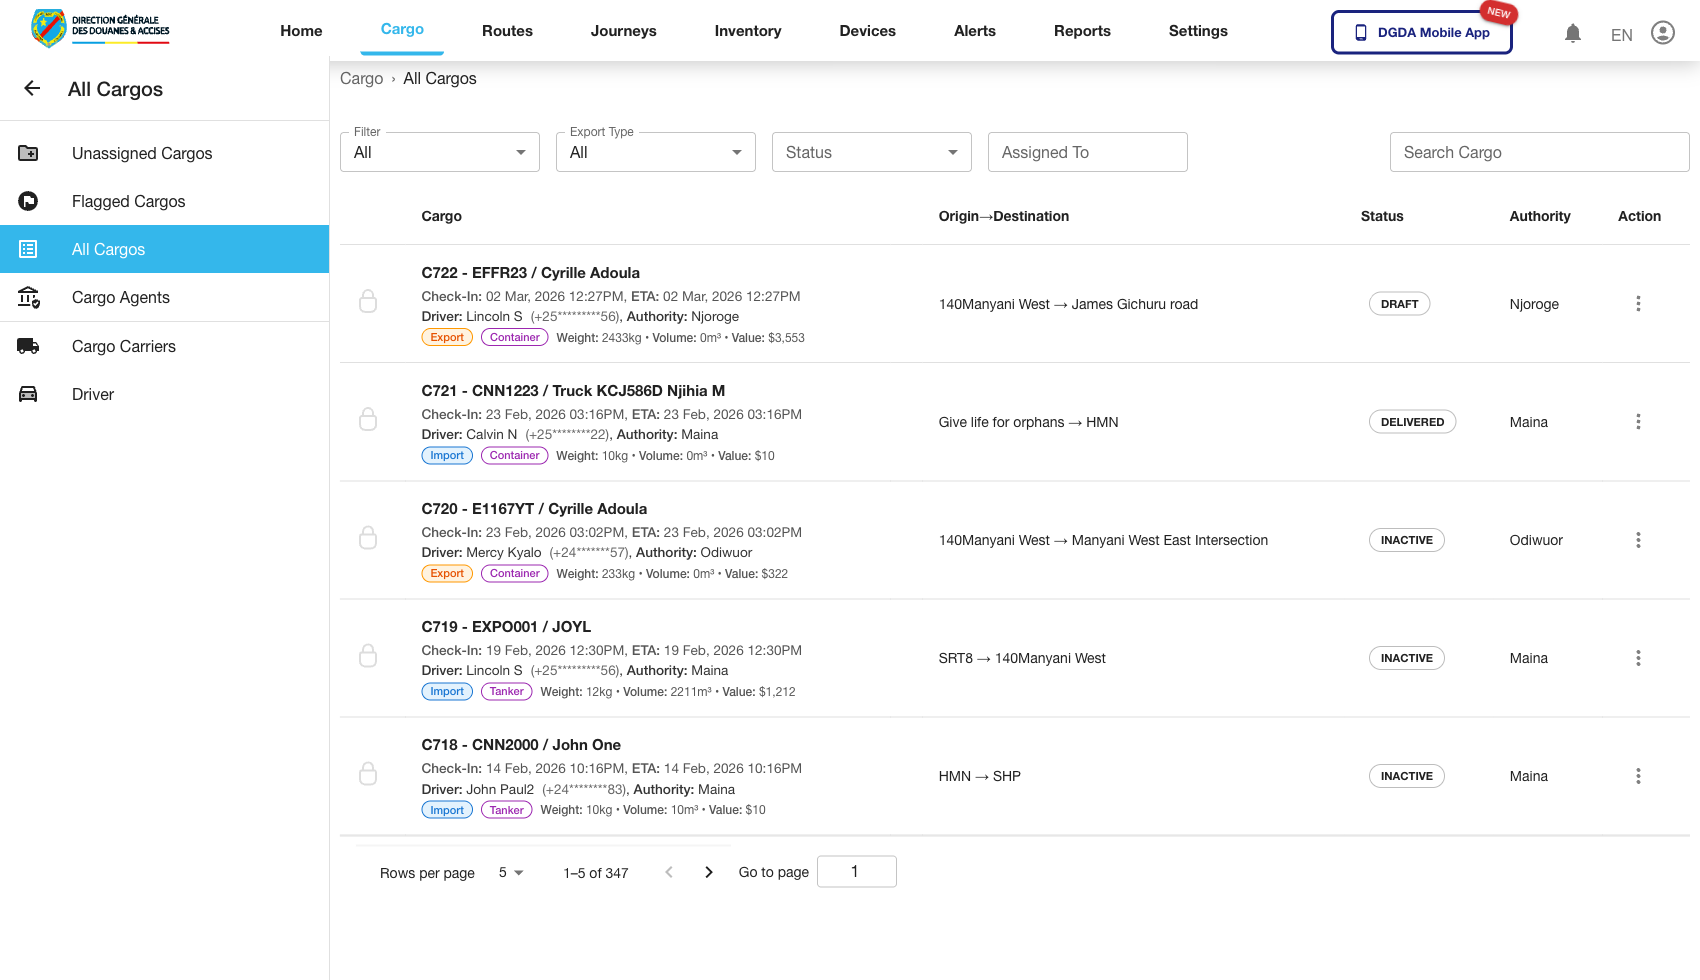
3. Review All Cargo
Purpose: See the full cargo register across different operational states.
Route / context: /cargo/all-cargos
Steps:
- Stay within the Cargo module.
- Open All Cargos.
- Search by identifier, state, or related metadata.
- Use this view when you need a complete record lookup rather than one queue only.
Expected result: The page shows a broader cargo table covering the full set of available records.
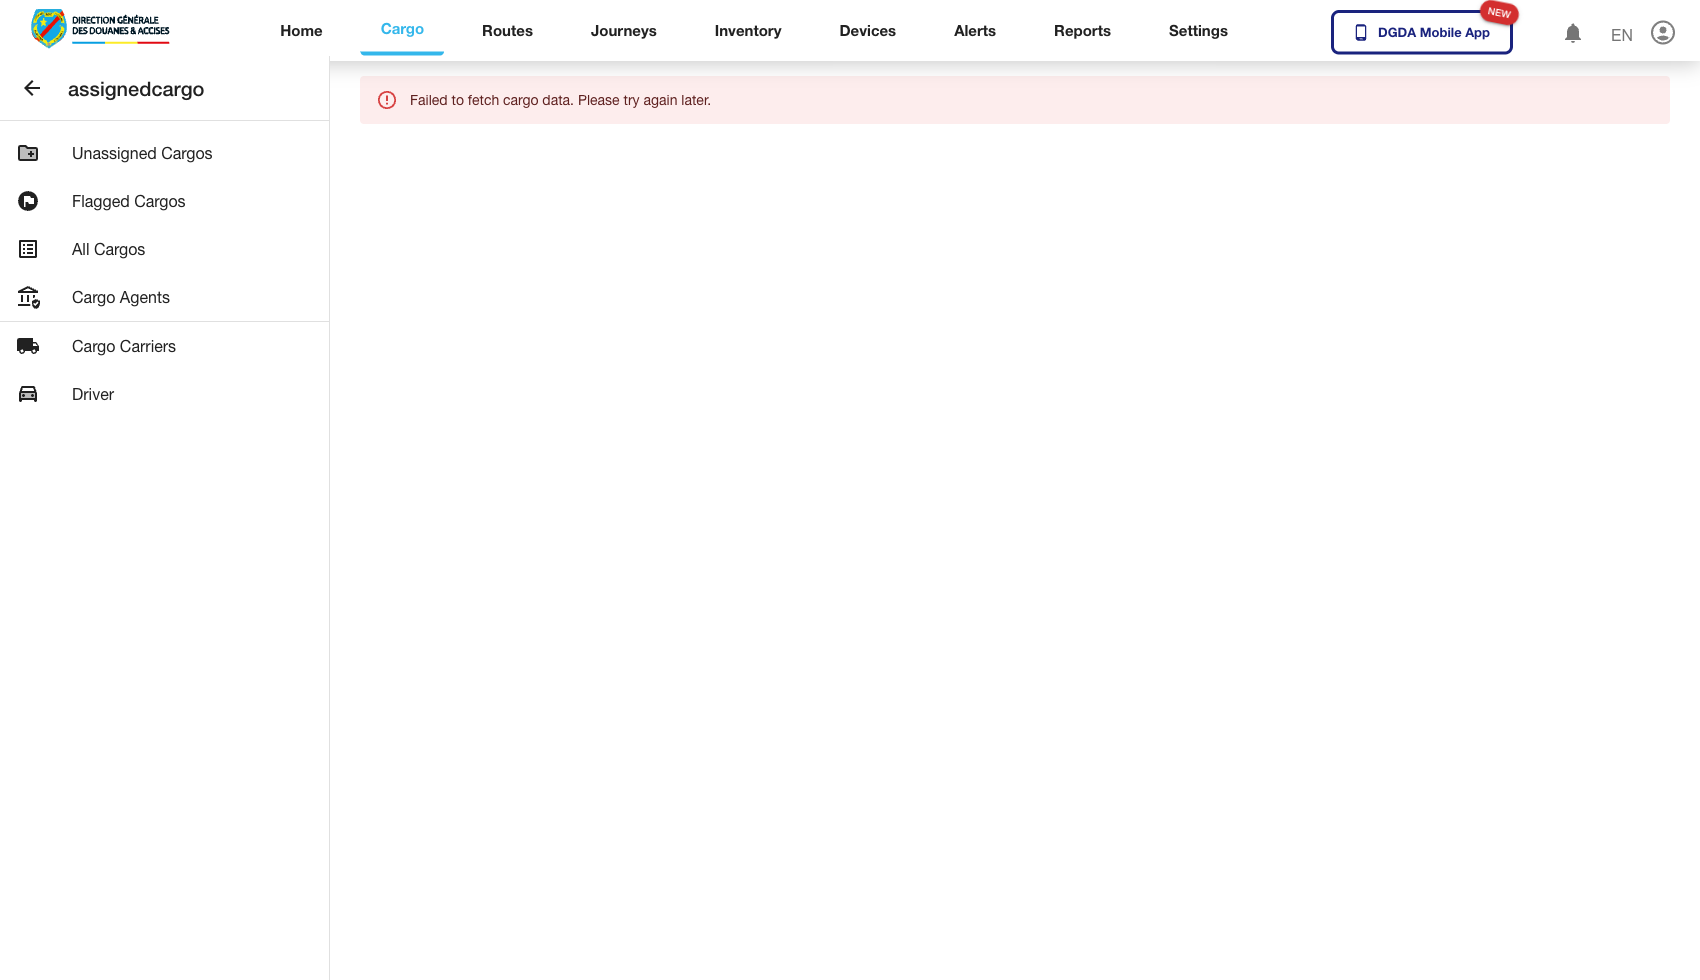
4. Review Assigned Cargo
Purpose: Inspect cargo already linked to journeys or operational movement.
Route / context: /cargo/assigned-cargo
Steps:
- Open Assigned Cargo in the left navigation.
- Review the current assigned records.
- Confirm journey-linked or assignment-related fields are present.
- Use row actions to inspect a specific assignment if your role permits it.
Expected result: The list shows only cargo that has progressed from preparation into assignment.
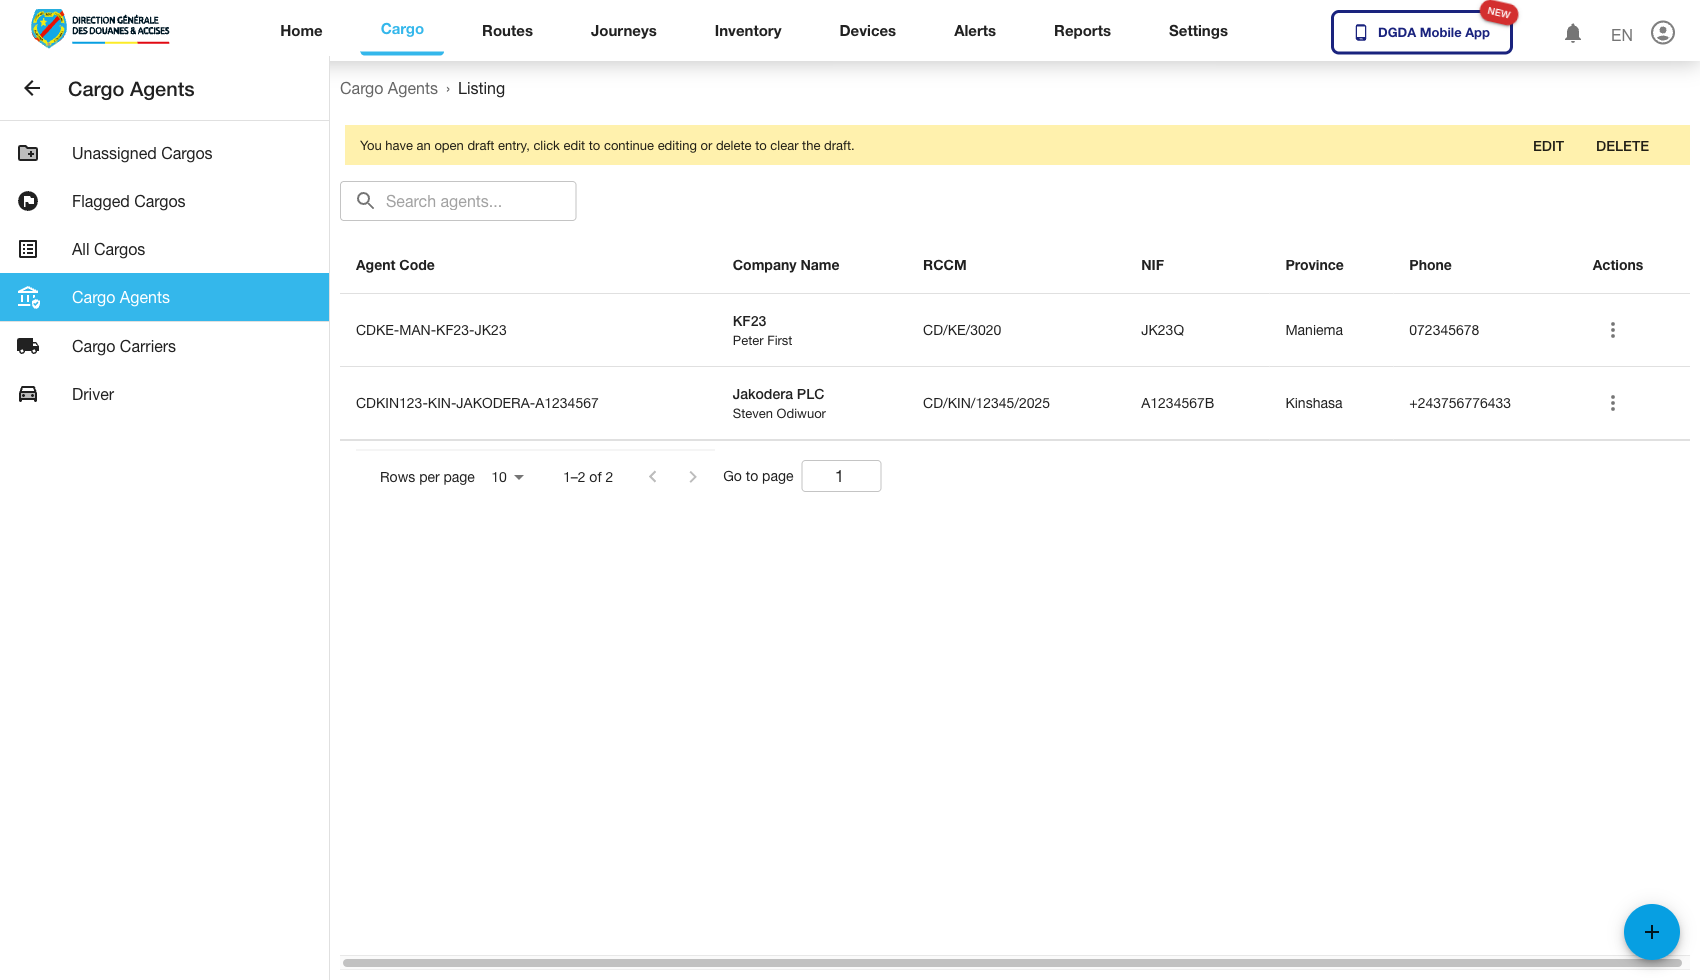
5. Review Cargo Agents
Purpose: Confirm the list of cargo agents available in the system.
Route / context: /cargo/agents-list
Steps:
- Open Agents under the Cargo module.
- Review available agent entries.
- Use the list to validate that the expected agents are present before downstream operational actions depend on them.
Expected result: The agent registry loads with management actions available according to the user's role.
6. Review Flagged Cargo
Purpose: Inspect cargo records that have been explicitly marked for attention.
Route / context: /cargo/flagged-cargo
Steps:
- Open Flagged Cargos from the cargo left navigation.
- Review the flagged units currently listed.
- Use filters or search if you need to isolate one cargo record.
- Open the row action menu when you need to investigate further.
Expected result: The flagged queue loads with actionable cargo records that require follow-up.
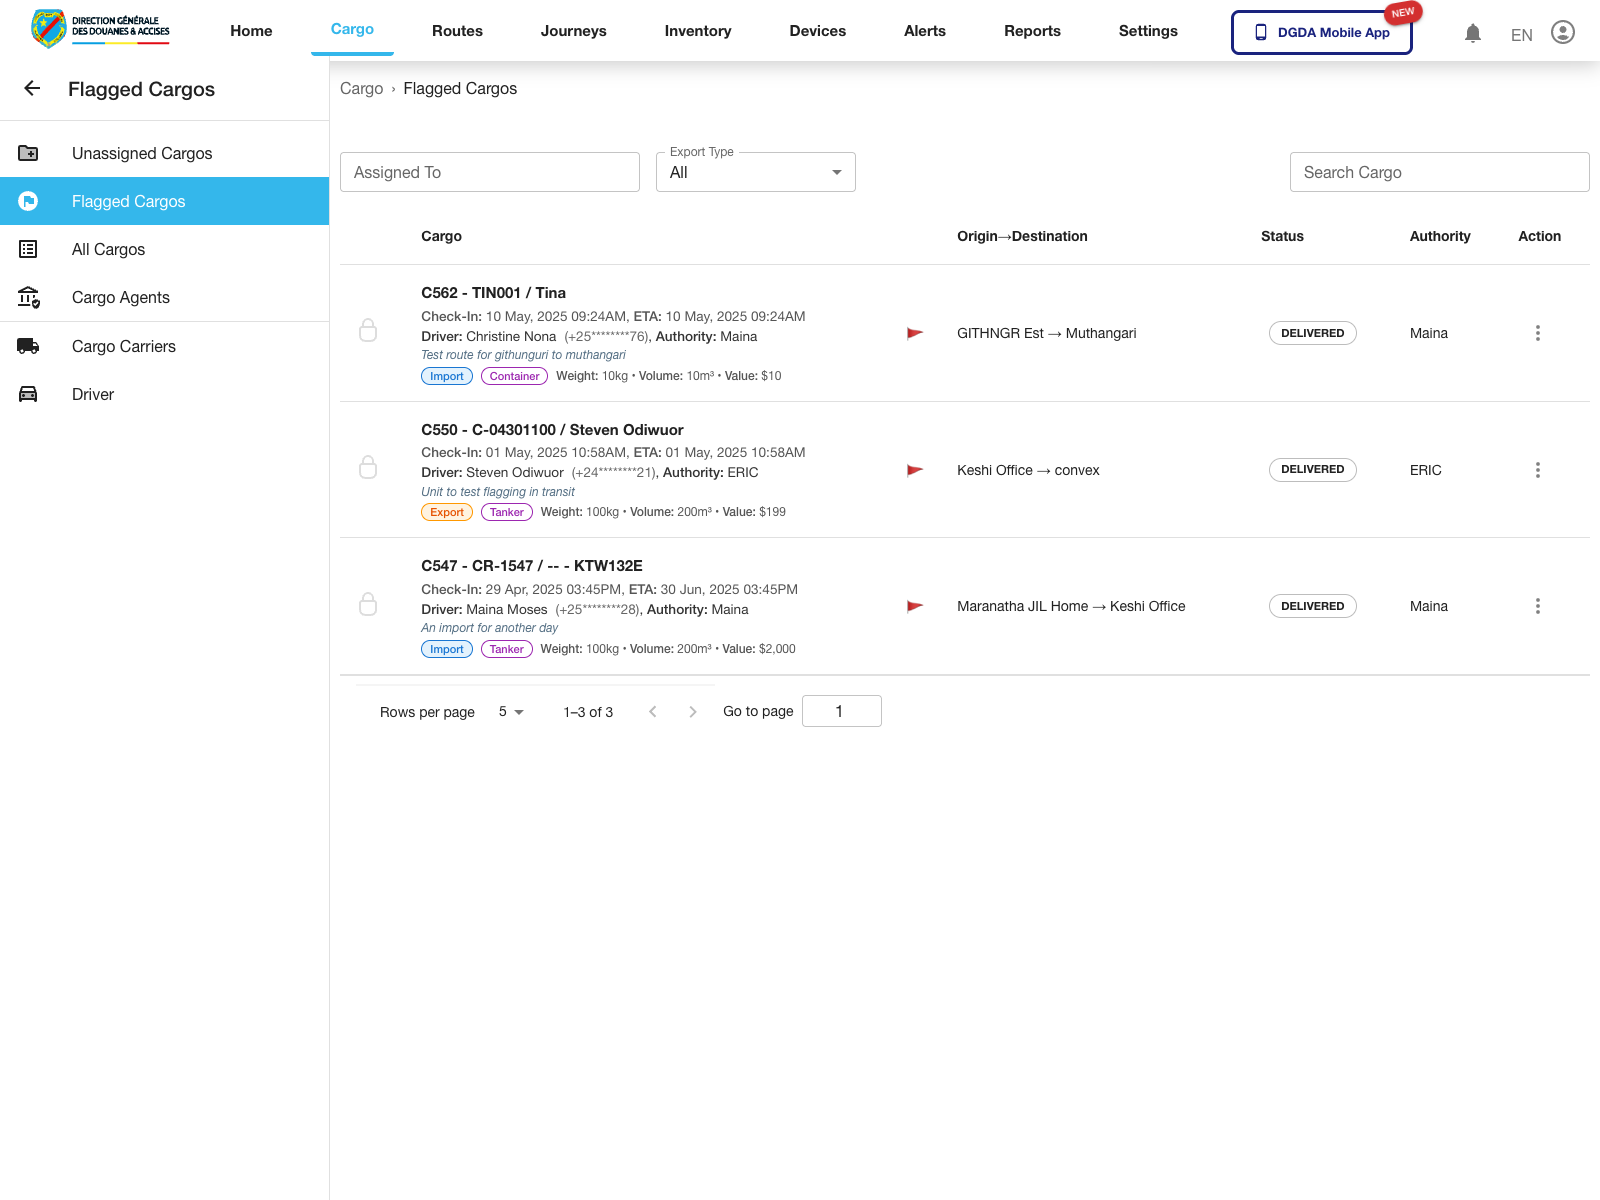
7. Open Flagged Cargo Actions
Purpose: Expose the row-level actions available from the flagged cargo queue.
Route / context: /cargo/flagged-cargo
Steps:
- Open Flagged Cargos.
- Locate the cargo record you need.
- Click the action button at the end of the row.
- Review the menu before choosing the next workflow.
Expected result: The row menu opens for the selected flagged cargo record.
Observed live actions: View, Edit, and Unflag Unit.

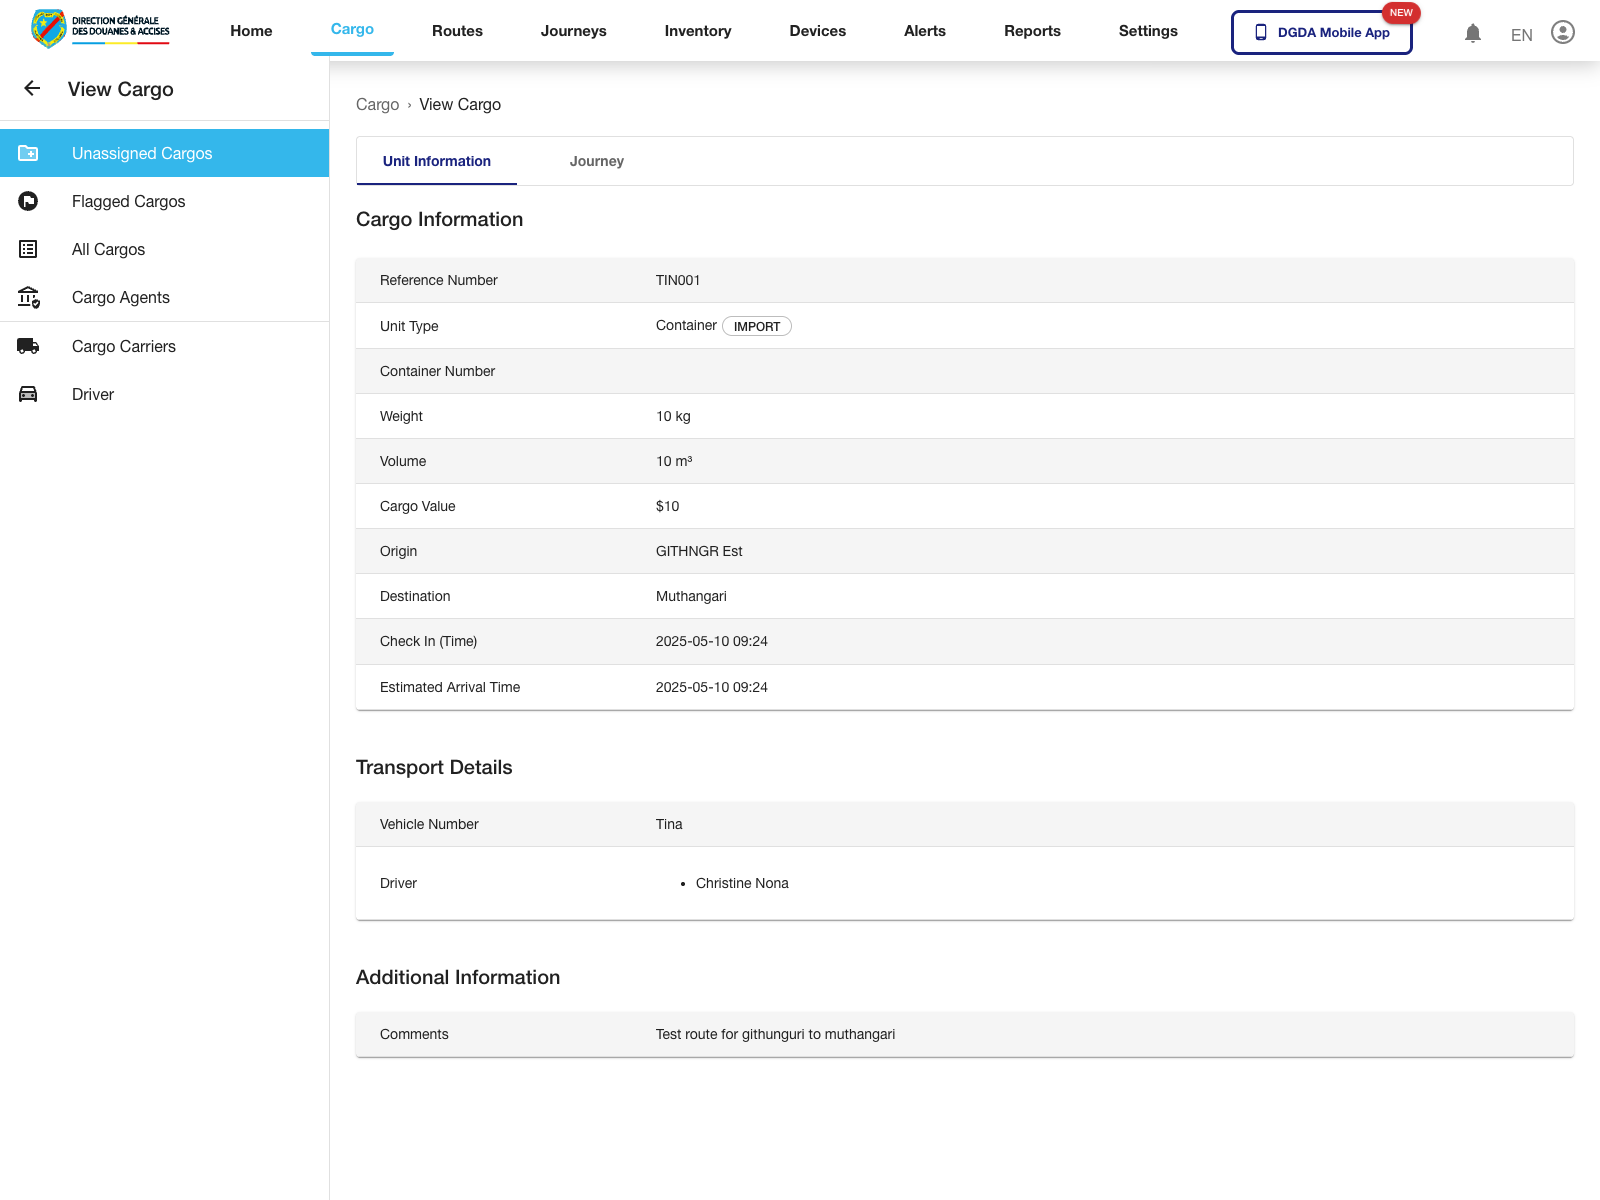
8. Open Cargo Detail from the Flagged Queue
Purpose: Move from a queue row into the detail page for one cargo unit.
Route / context: /cargo/flagged-cargo -> /cargo/view-unassigned/:id
Steps:
- Open the flagged cargo row action menu.
- Select View.
- Wait for the detail page to load.
- Review the major detail blocks on the page.
Expected result: The system opens the cargo detail page for the selected record.
Observed live sections: Cargo Information, Transport Details, and Additional Information.
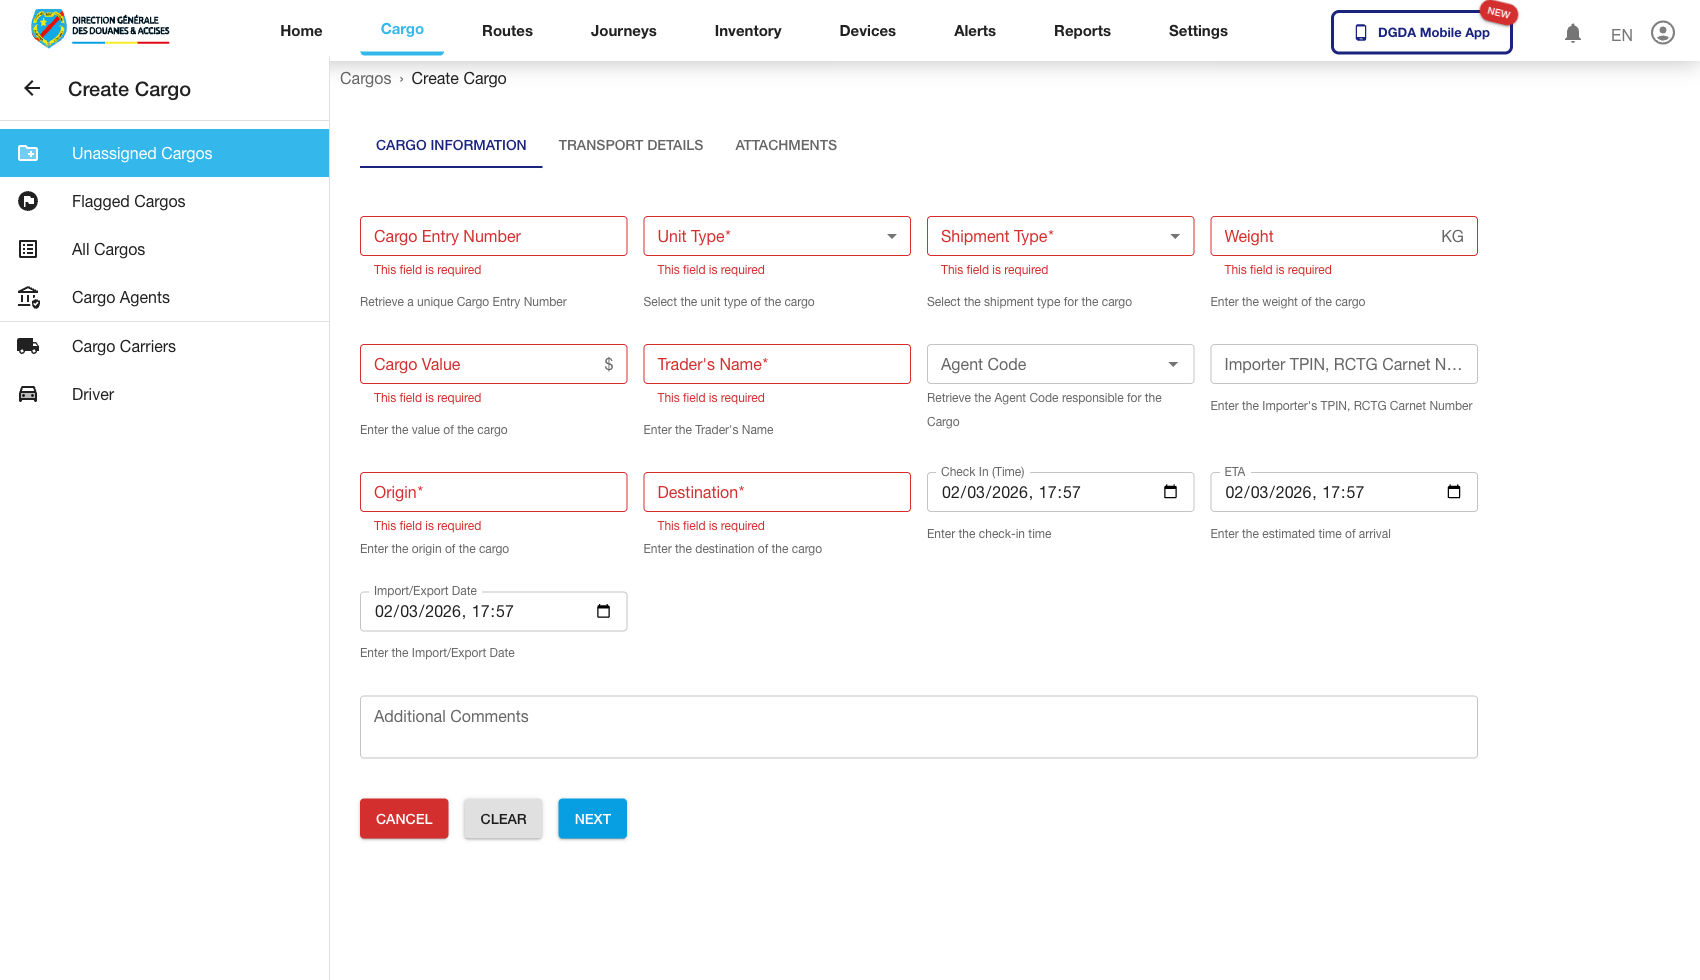
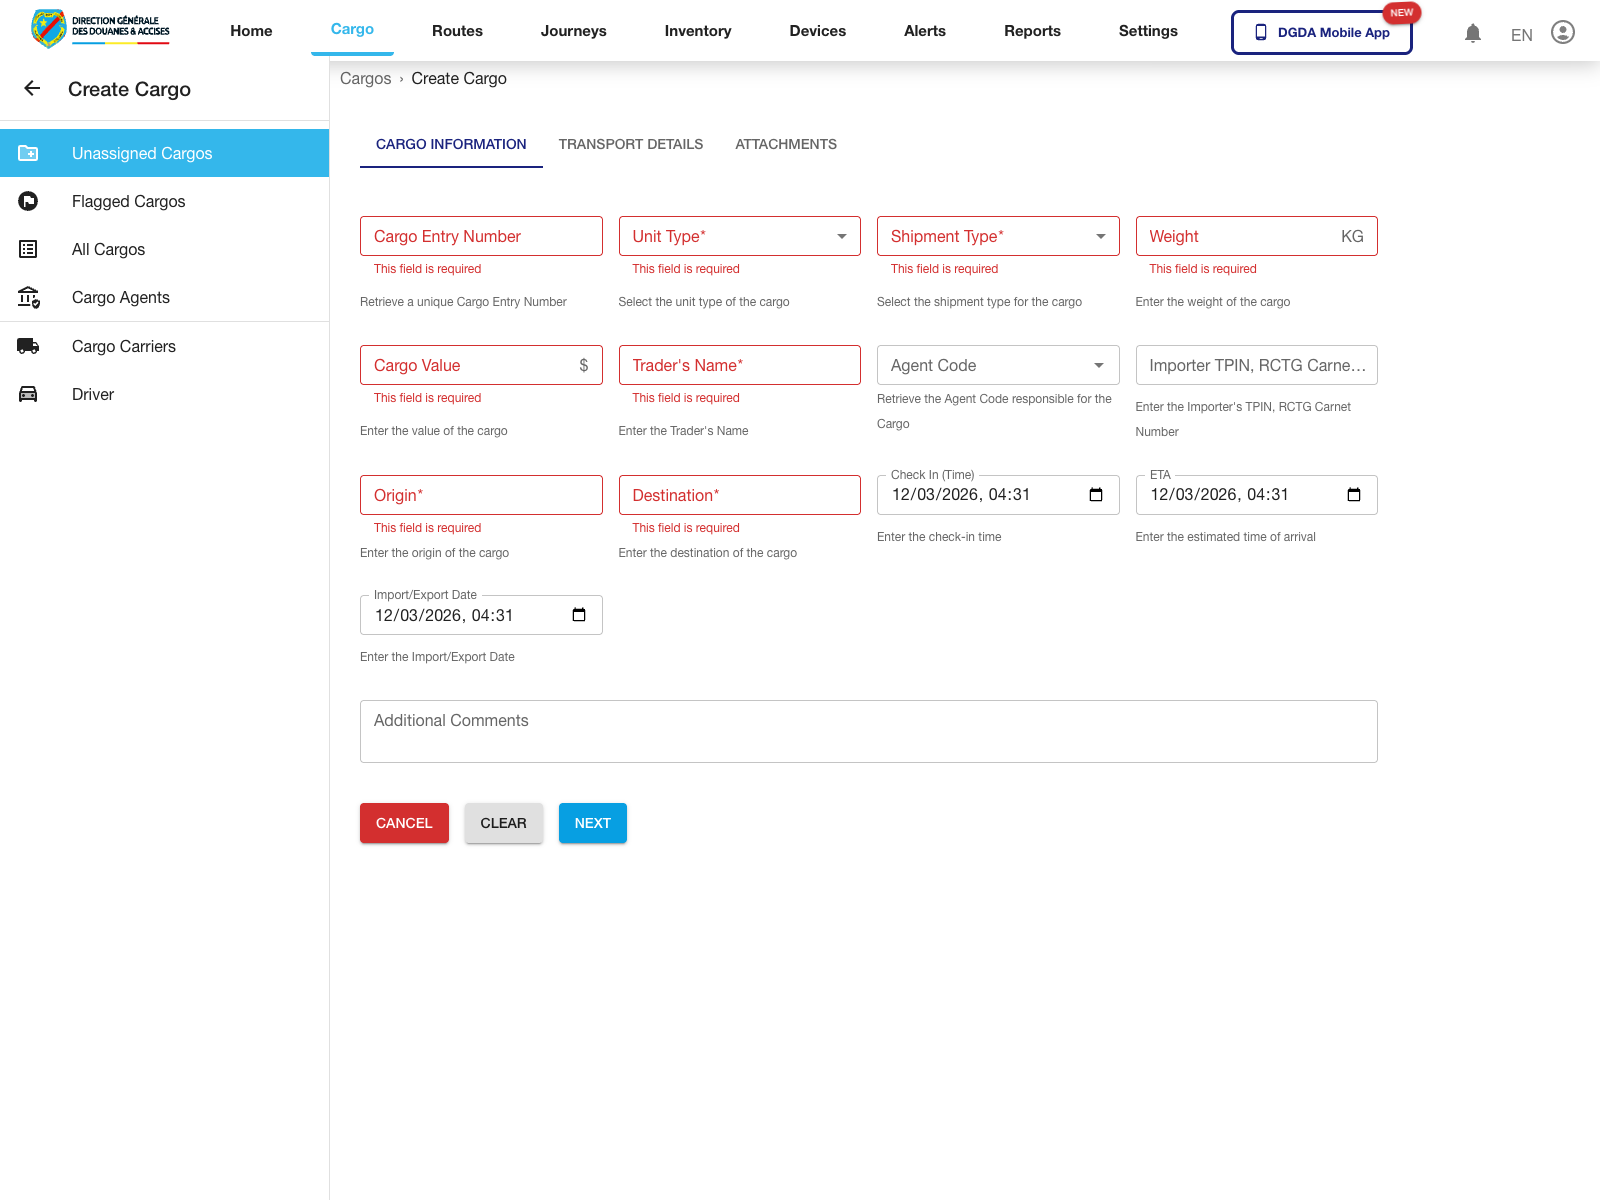
9. Create a New Cargo Record
Purpose: Register a new cargo record in the platform.
Route / context: /cargo/create-cargo
Steps:
- Open Create Cargo from the Cargo module.
- Complete the required fields in the form.
- Review route, journey, or assignment-related data where applicable.
- Submit the form.
- Confirm the new record is created and appears in the expected cargo workflow.
Expected result: A new cargo record is saved successfully and enters the appropriate cargo lifecycle state.
10. Continue Editing a Draft Cargo Record
Purpose: Resume an unfinished cargo entry from the draft banner rather than starting a new record from scratch.
Route / context: /cargo/unassigned-cargo -> /cargo/create-cargo
Steps:
- Open Unassigned Cargo.
- Use Edit in the draft banner.
- Wait for the cargo form to reopen.
- Continue completing the form fields and tabs that were left unfinished.
Expected result: The draft reopens in the cargo form for continuation.
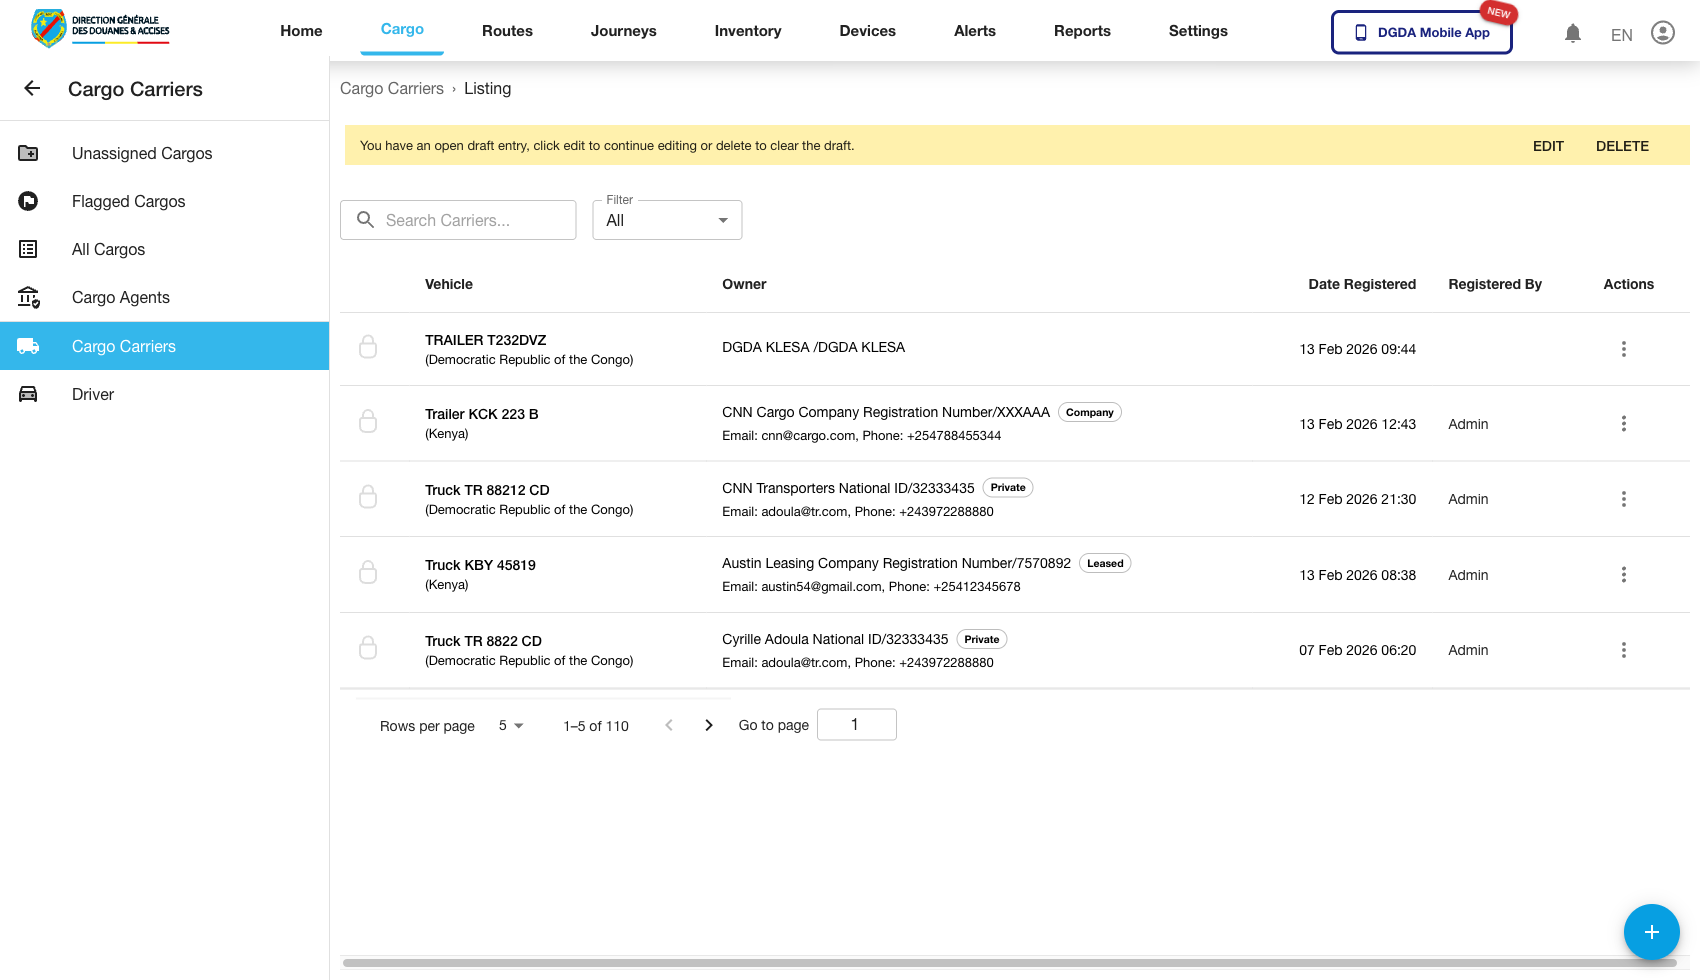
11. Review Carriers / Vehicles
Purpose: Confirm that transport vehicles are registered and available for operational assignment.
Route / context: /cargo/vehicles-list
Steps:
- Open Cargo Carriers in the Cargo module.
- Search for the relevant vehicle or carrier record.
- Confirm the record appears with the expected identifying information.
- Continue to detail or edit actions if your permissions allow it.
Expected result: The vehicle registry shows the available carrier assets used in transport operations.
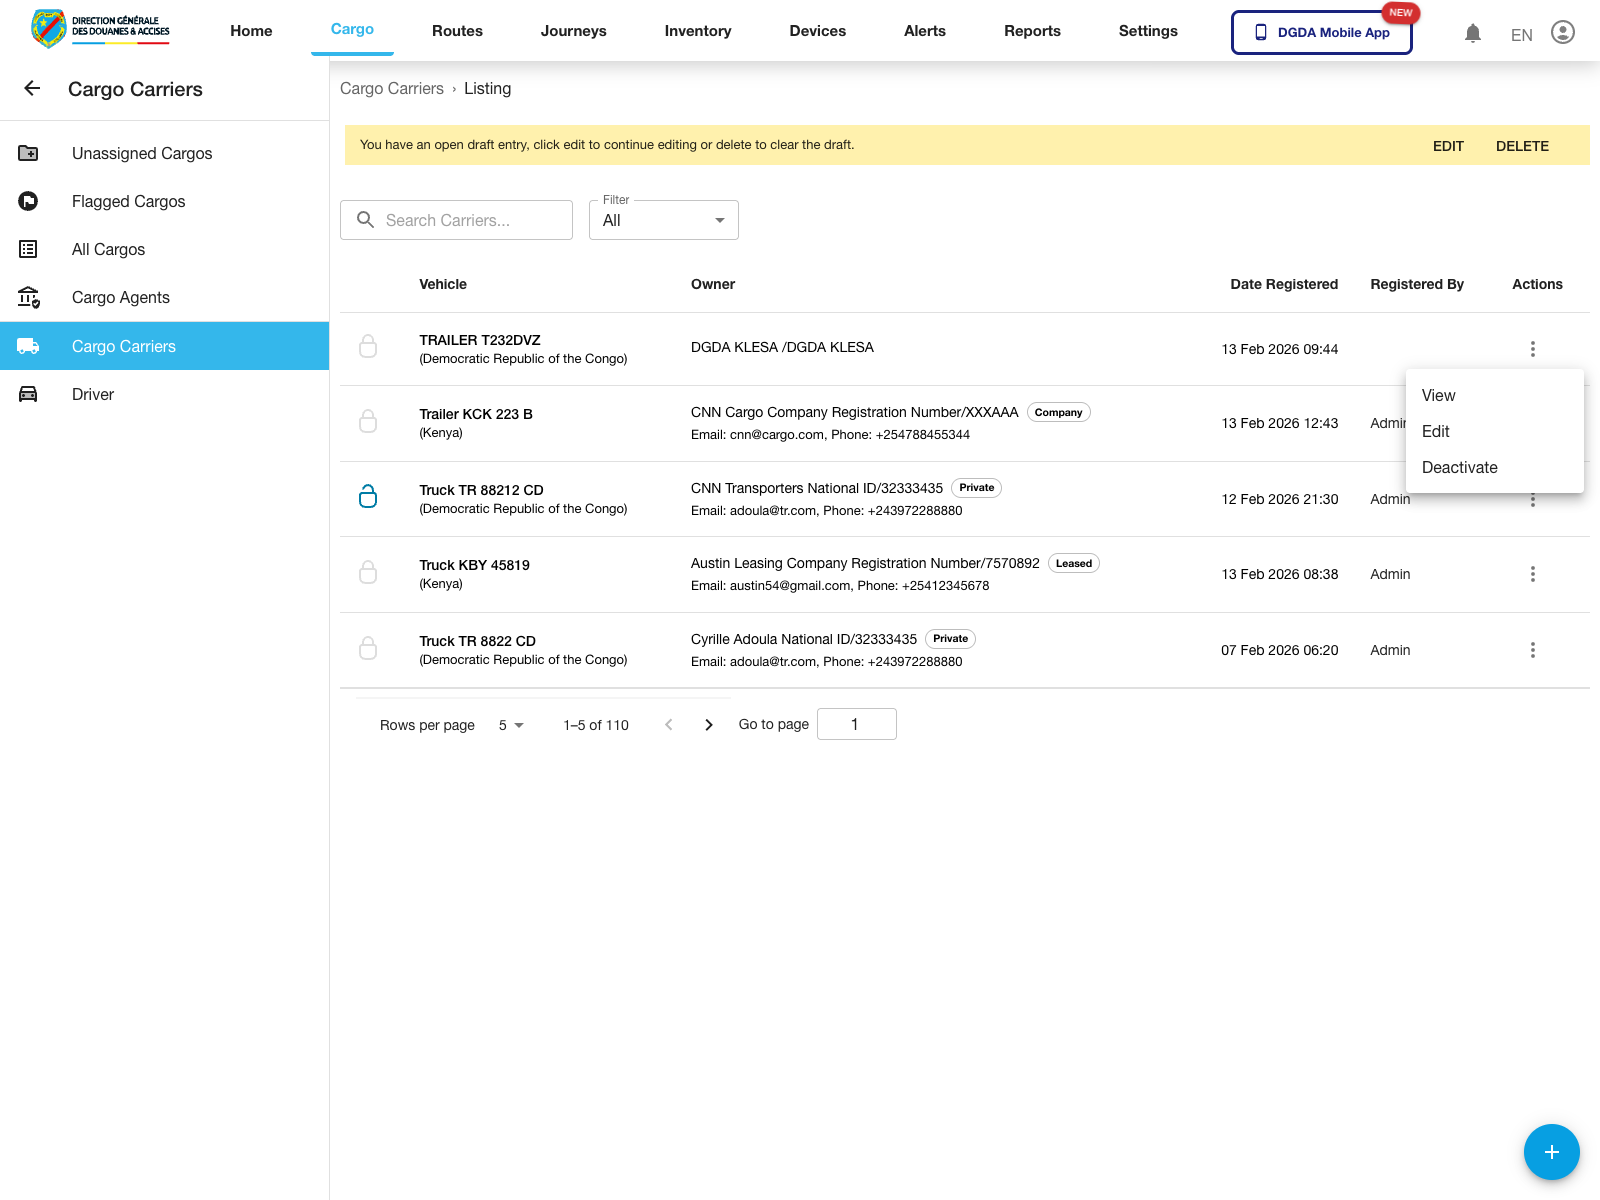
12. Open Carrier Actions
Purpose: Inspect the row-level actions available for a registered carrier.
Route / context: /cargo/vehicles-list
Steps:
- Open Cargo Carriers.
- Locate the carrier row you need to manage.
- Click the action button at the end of the row.
- Review the actions available for that carrier.
Expected result: The carrier row menu opens and exposes the available next actions.
Observed live actions: View, Edit, and Deactivate.
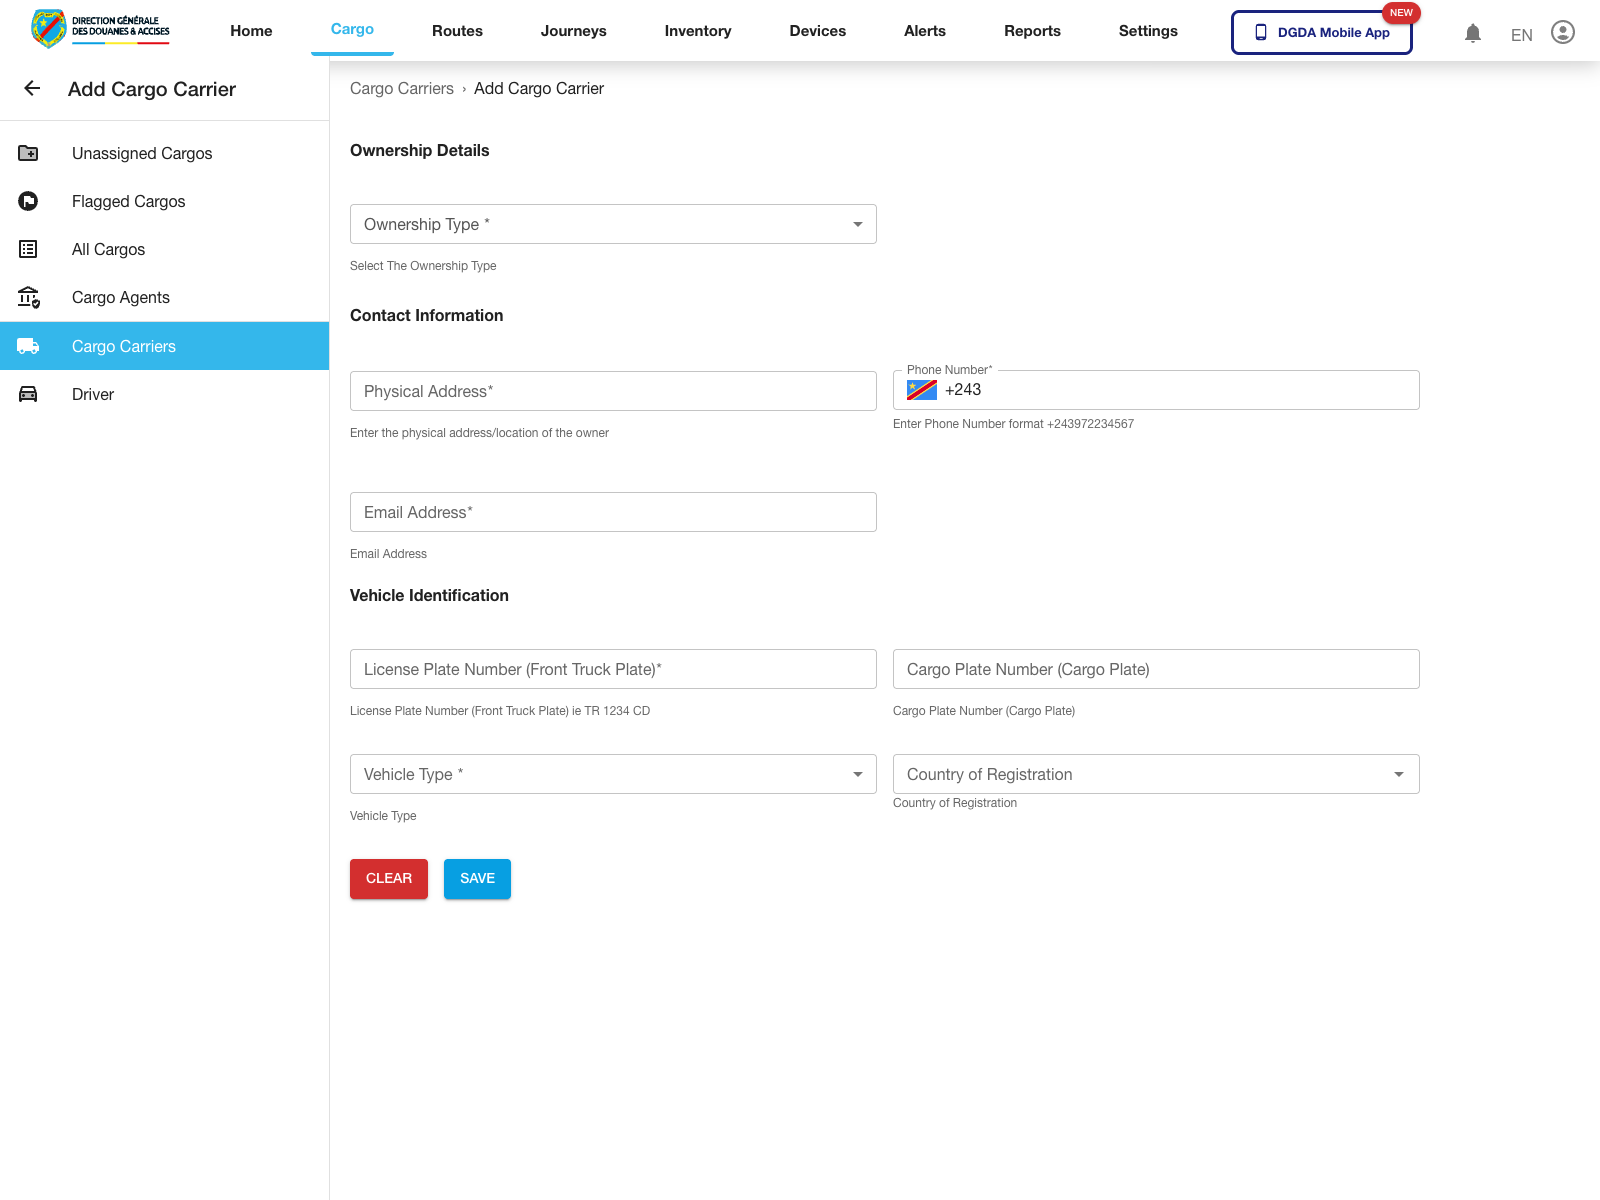
13. Add a Carrier
Purpose: Register a new carrier or vehicle record.
Route / context: /cargo/vehicles-list -> /cargo/add-vehicle
Steps:
- Open Cargo Carriers.
- Click the floating add button.
- Complete the carrier or vehicle form.
- Save the record when all required fields are complete.
Expected result: The portal opens the add-carrier form and allows the new record to be entered.
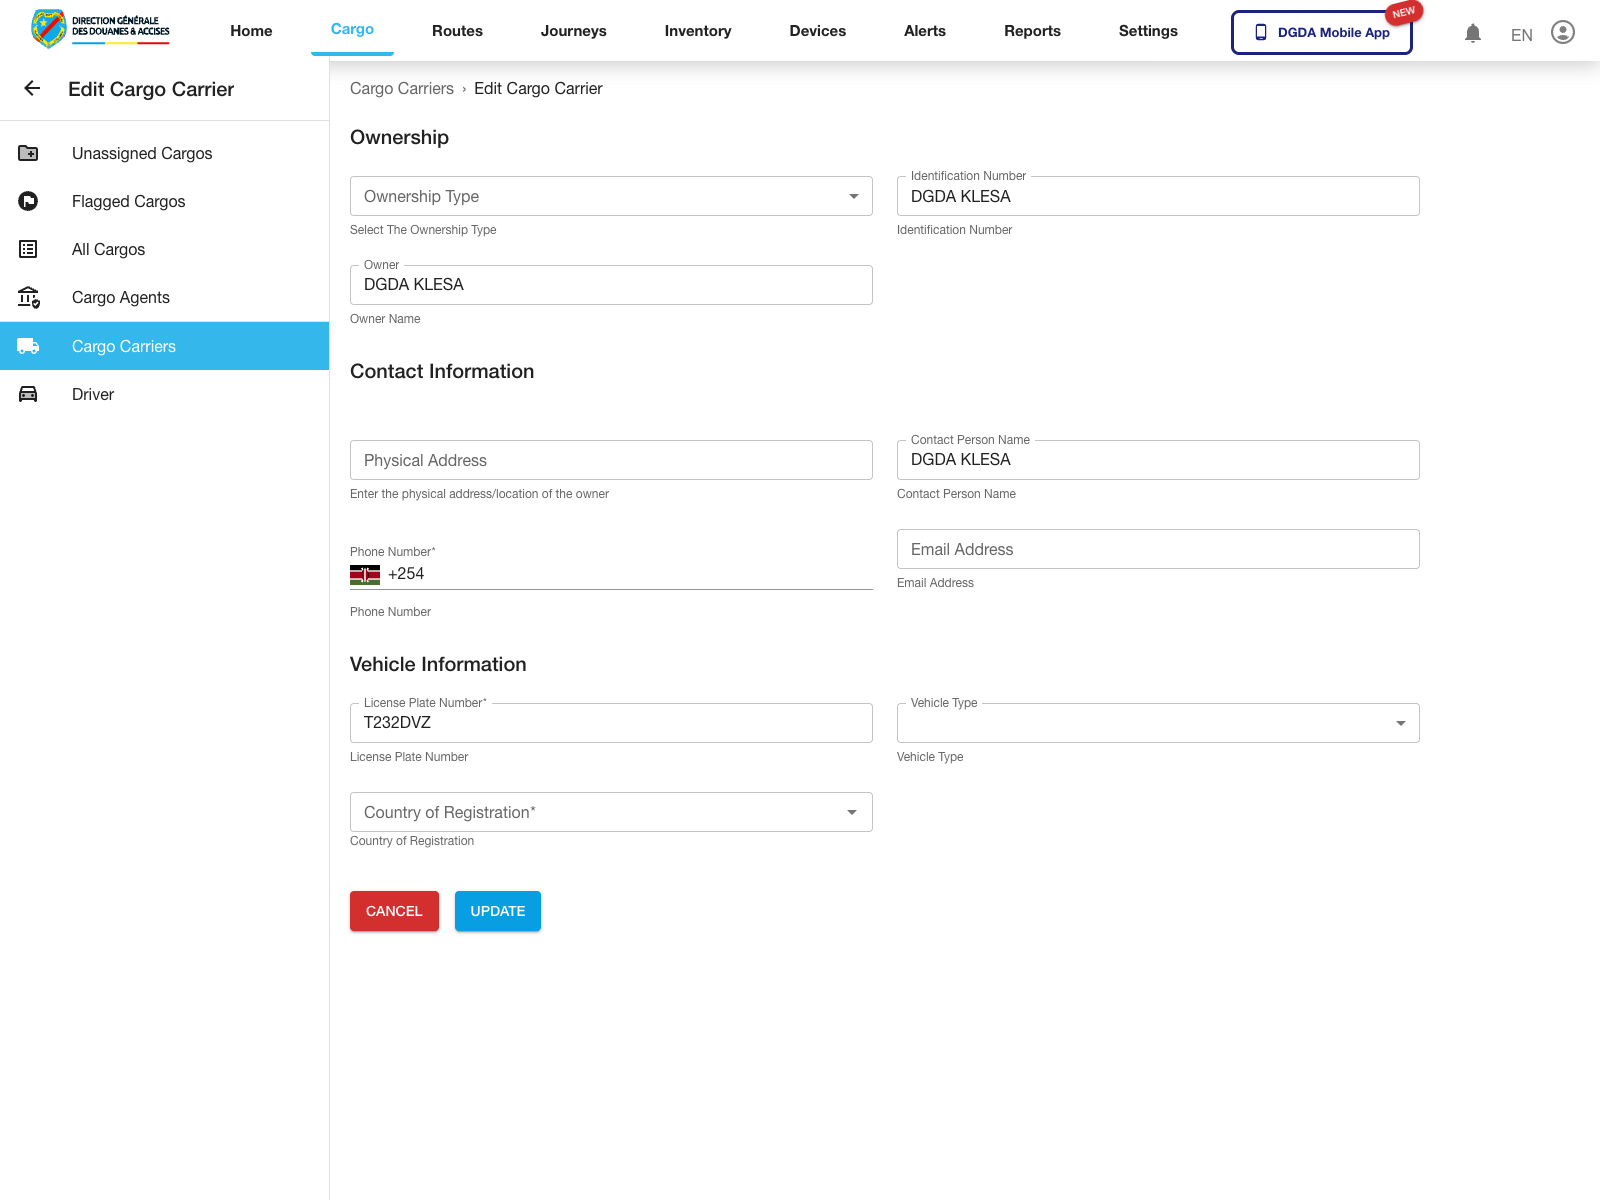
14. Edit a Carrier
Purpose: Update a registered carrier or vehicle record.
Route / context: /cargo/vehicles-list -> /cargo/edit-vehicle
Steps:
- Open the action menu for the carrier you need to change.
- Select Edit.
- Review and update the carrier form fields.
- Use Update when the changes are ready to be committed.
Expected result: The portal opens the carrier edit form for the selected record.
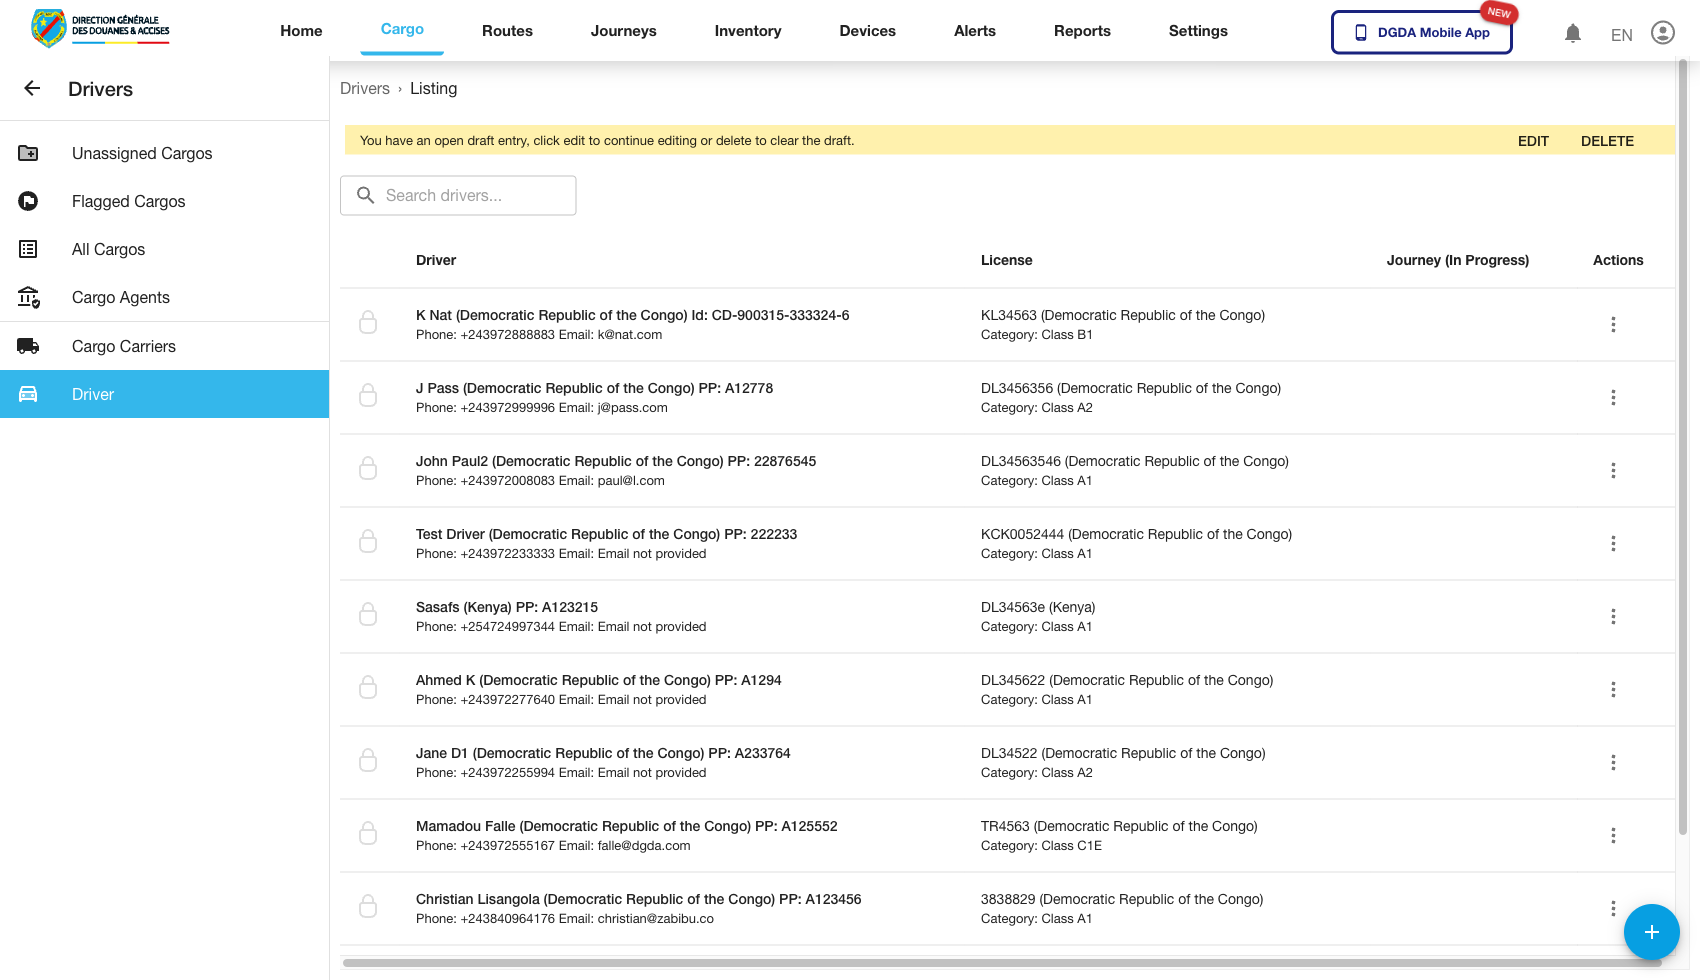
15. Review Drivers
Purpose: Validate the driver registry before assigning or investigating transport activity.
Route / context: /cargo/drivers-list
Steps:
- Open Drivers in the left navigation.
- Search or browse for the target driver.
- Confirm the driver's operational information is visible.
- Open row detail or edit actions where permitted.
Expected result: The driver registry loads with searchable driver records and row-level actions.
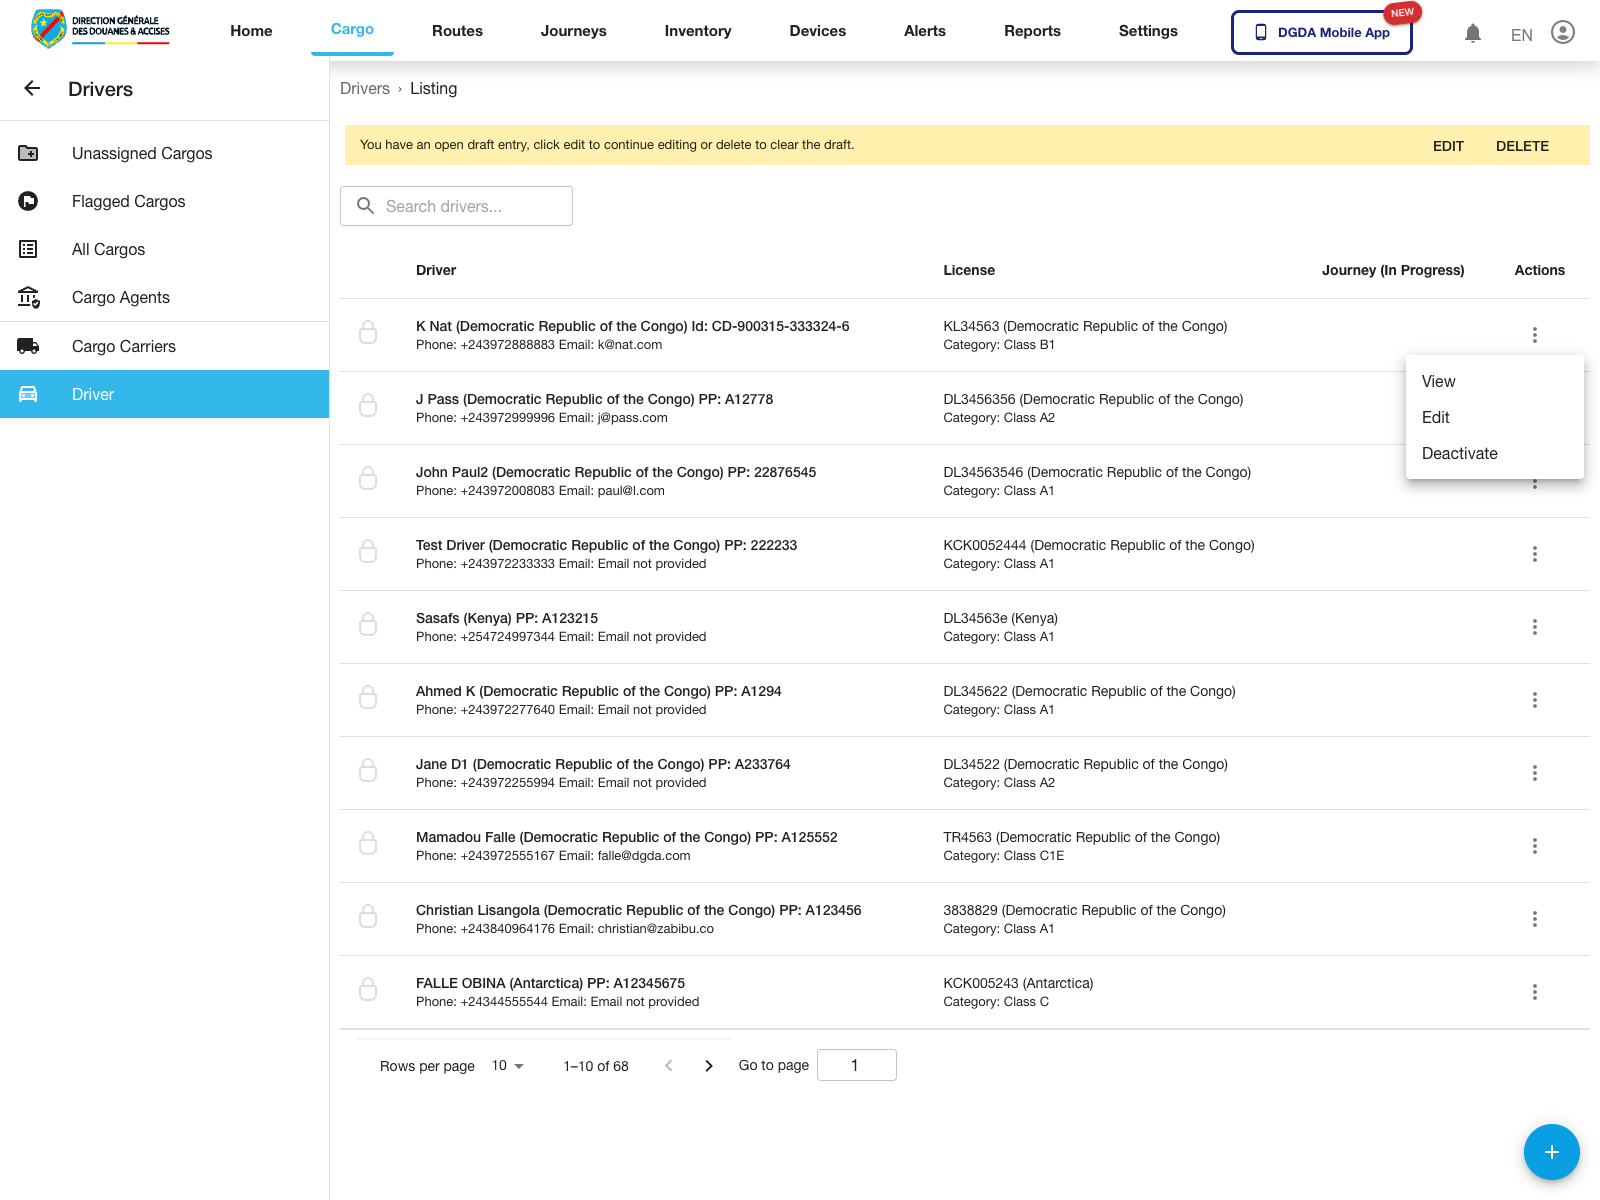
16. Open Driver Actions
Purpose: Inspect the row-level actions available for a driver record.
Route / context: /cargo/drivers-list
Steps:
- Open Drivers.
- Locate the driver row you want to inspect.
- Click the action button on that row.
- Review the available actions before proceeding.
Expected result: The driver row menu opens for the selected record.
Observed live actions: View, Edit, and Deactivate.
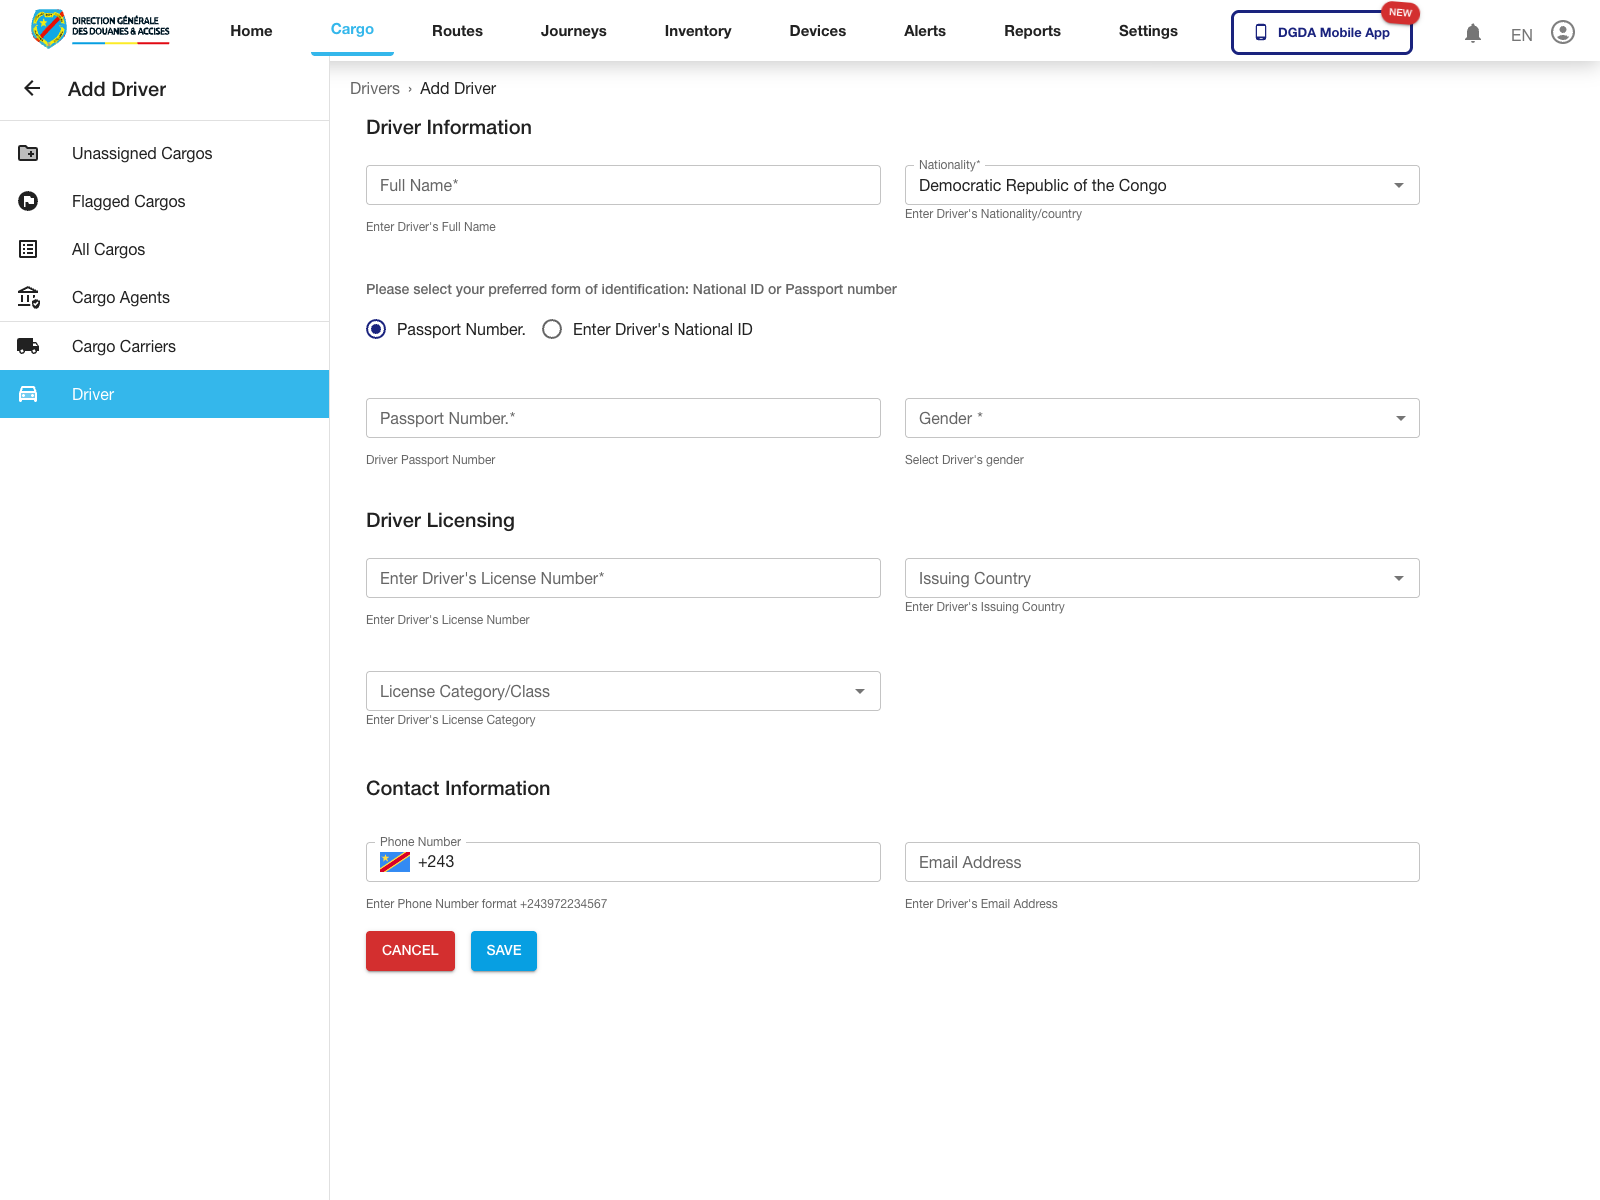
17. Add a Driver
Purpose: Register a new driver in the transport registry.
Route / context: /cargo/drivers-list -> /cargo/add-driver
Steps:
- Open Drivers.
- Click the floating add button.
- Complete the driver form fields.
- Save the record when all required data is present.
Expected result: The driver creation form opens and the operator can register a new driver.
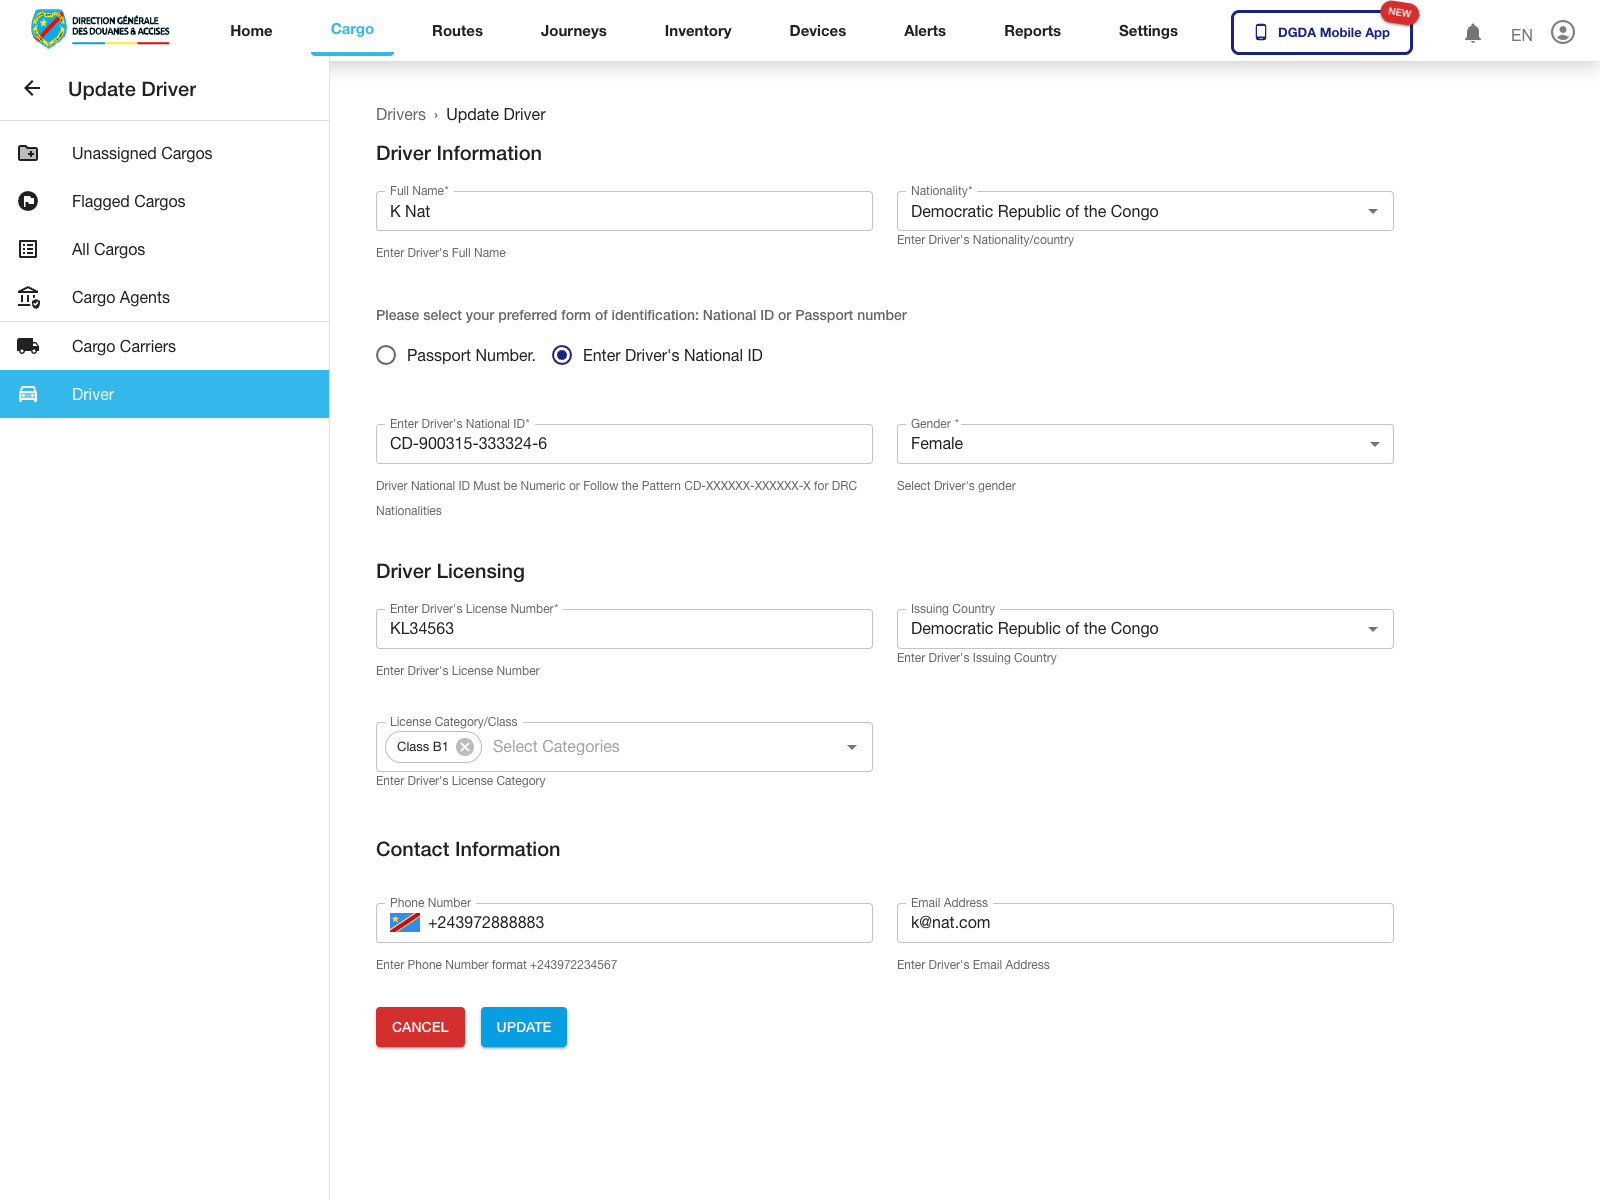
18. Edit a Driver
Purpose: Update an existing driver record.
Route / context: /cargo/drivers-list -> /cargo/edit-driver/:id
Steps:
- Open the action menu for the target driver.
- Select Edit.
- Update the driver form fields as needed.
- Use Update to commit the change.
Expected result: The portal opens the edit form for the selected driver record.
19. Remaining Validated Gaps
The following cargo workflows still need their own validated capture before they should be documented as final operator procedures:
- delete a cargo draft to completion
- unflag a flagged cargo to completion
- deactivate or reactivate carriers to completion
- deactivate or reactivate drivers to completion